FILMORA 15 – WHAT’S NEW? AI EXTEND, DYNAMIC CAPTIONS, TRUE TIMELINE EDITING + INSTALL GUIDE
November 12, 2025 / by Marco / Categories : ai, Business, Software
There is a particular thrill to installing a major new release of your everyday editor, especially when your workflow is comfortable and productive in the current version. That feeling is right at the heart of the move from Filmora 14 to Filmora 15. This upgrade promises fresh creative features, faster handling of complex projects, and a smarter layer of intelligence threaded through the toolset. In this comprehensive first look, I will walk through the installation experience, explore the headline updates, and offer practical thoughts on where they fit in a typical creator workflow. I will also share early impressions of performance on older hardware, because not everyone edits on a brand new rig.

From Filmora 14 to Filmora 15
Filmora 15 arrives as a major step above 14, with version numbering that reflects a significant branch in development. The installer I used was labelled as 15.0.15 960, which suggests a specific build while the platform sits under the broad umbrella of version 15. Future point releases will iterate quickly, but this main line lays out the fundamental toolkit. If you are comfortable with 14, you should find the interface familiar while discovering new creative options and smarter management tools that address real challenges for ambitious projects.
That blend of familiarity and capability matters. When a tool adds features, it must do so without breaking muscle memory. The first impressions from navigation and launch will be reassuring in that respect, and the differences are mostly additive rather than disruptive. The experience here feels like Filmora has been listening to the need for better multi project management, improved captions, and cleaner ways to enhance clips with AI without losing editorial control.
Installation Experience and Keeping Data Safe
The installer detects an existing copy of Filmora 14 and makes it clear that it can install alongside or replace depending on your choices. As a rule of thumb with any editor upgrade, I recommend taking default settings but first double checking the chosen installation folder and whether any migration options could overwrite personal assets. In this case, I accepted the defaults and was careful to verify that the installer would not remove custom content. Filmora handles this smoothly, and as you will see later, my bespoke templates and audio files remained available after the upgrade.
The setup wizard is straightforward. Click through the steps, give it a moment to extract and copy components, and then let the installer complete its checks. It is polite about the presence of an older version and does not nag you into removing it. That means you can install 15, explore the new features, and keep 14 close at hand if you want to compare behaviour on a live project before committing fully.

Once finished, the installer presents a confirmation window that Filmora 15 is ready to launch. I opted out of joining the user experience program during setup. For many users, this is a personal call. Participation can help improve the product, but if you prefer a quieter footprint, declining is fine and has no impact on core functionality.
System Environment and Compatibility
Filmora 15 conducted an environment test on first launch, which is a useful early check, especially on older hardware. My primary laptop for this trial is a Metabox unit with an Intel i7 processor, 32 gigabytes of memory, multiple solid state drives, and an Nvidia graphics card. Under Filmora 14, this machine was reliable with smooth timeline scrubbing and clean exports, even with moderately complex projects that blend motion graphics, multiple audio tracks, and smart effects. The question is whether 15 maintains that stability and whether the new features, especially those powered by AI, add extra demand.
Initial signs are promising. The quick environment test passed. The interface loaded promptly, and the media library and effects panels felt responsive. GPU acceleration for certain filters and transitions is well supported by Filmora, and the Nvidia card helps with both preview playback and export times. If you are working on a similar mid range machine, you should expect Filmora 15 to perform comparably to 14, with the potential for gains if you adopt new workflows that make smarter use of compound clips and multi timeline management, which I will unpack later.

First Launch and Interface Overview
On launch, the Filmora 15 icon appears fresh but reassuringly close to the previous branding. The initial splash presents the option to open projects, start a new one, or browse templates and media packs. The interface layout is markedly similar to 14, which is a good thing. Your timeline, preview monitor, media and effect panels, and toolbars occupy the familiar positions. The stand out change is the presence of new tool buttons and entries in the effects and AI sections, and the What is new window that highlights brand new capabilities.
It is easy to overlook these notes in the excitement of diving into a project, but take a moment to read them. They frame the core additions, and understanding their intended use helps you spot where they might accelerate common tasks or unlock fresh creative ideas.
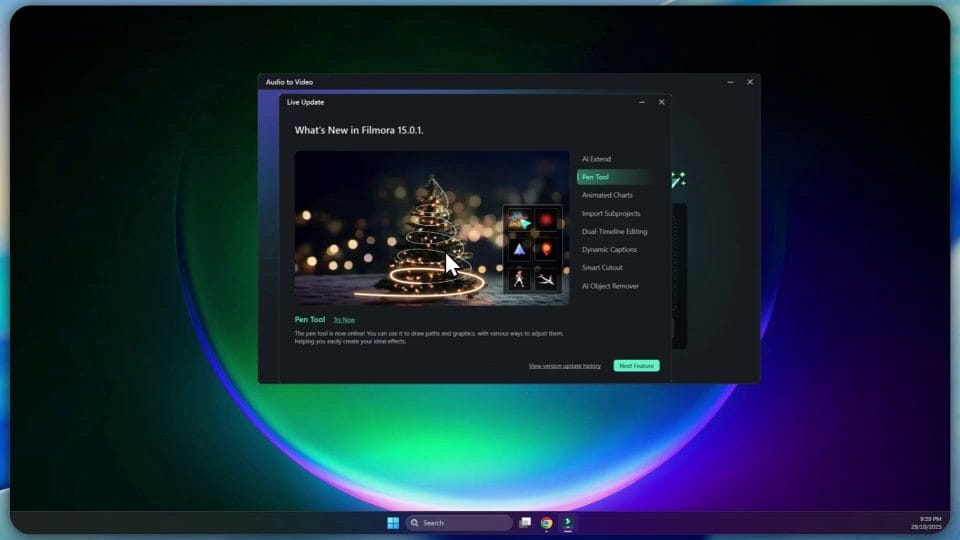
What is New in Filmora 15.0.1
The feature highlights in 15.0.1 offer a spread across creative augmentation, project management, and text workflow. Here is a closer look at the ones that make the biggest difference in day to day editing.
AI Extend
AI Extend promises to intelligently extend the length or content of a video segment. Think about cases where a talking head clip needs a few extra seconds to accommodate a graphic on screen, or where a cutaway shot could be extended to cover a narration segment without an abrupt jump. Rather than looping a frame or slowing down the clip, AI Extend can generate additional content based on the surrounding frames and motion, maintaining coherence and avoiding obvious repetition.
In practice, I imagine using AI Extend in three scenarios. First, smoothing transitions where a scene change happens slightly too soon and you want another second to finish a sentence. Second, bridging moments in a montage where beats do not perfectly align. Third, creating longer B roll segments from shorter captures, which is particularly attractive for creators who shoot nimble, fast takes on the go and need flexibility in edit. The key will be to evaluate how natural the extensions look for different types of footage. Detailed textures and prominent motion will challenge any generative method. Wide shots, soft backgrounds, and slower movement are likely the sweet spot.
Pen Tool for Paths and Graphics
The new pen tool deserves attention. It allows you to draw vector paths and shapes directly within Filmora. This is more than simply adding a line. With a path you can anchor motion, create animated reveals, build custom lower thirds, trace routes on maps, or craft stylish arrows and callouts that move with content. The ability to work with Bézier handles gives fine control over curves, and keyframes let you time the animation precisely. Together, this removes the need to jump into a dedicated motion graphics app for many common overlay tasks.
For presentations, the animated charts shown in the new features prompt are a clear clue to use cases. Imagine preparing a quick product comparison with a bar chart that rises, or a pie chart that fills with a smooth easing curve. Tie these to your narration, and you have engaging visual support without third party tools. Pair the pen tool with text and dynamic captions, and you can build layered explainer sequences within a single timeline.
The practical tip here is to create a small library of reusable shapes that match your brand colours and style. Save these as compound clips or export as templates to keep your look consistent across videos. Then set up animation presets for common motions, such as a gentle left to right reveal or a bounce in on titles. That way, the pen tool becomes not just a creative toy but a repeatable part of your workflow that saves time every week.

Import Sub Projects and Compound Clips
For creators working on series or recurring formats, Import Sub Projects could be the most valuable addition. Filmora 15 lets you bring multiple project files into a master project as compound clips. This means you can build episodes or segments in their own projects and then assemble them into a larger programme without flattening the content. Each compound clip retains its internal structure, so if you need to tweak colour grading, adjust timing, or replace an asset inside one segment, you can do that without disturbing the entire master timeline.
From a management standpoint, this enforces clean separation between parts of a project and encourages reuse of materials. If you have a research segment that recurs with slight variations, you can maintain a canonical sub project and update it centrally. Custom intros, sponsorship messages, and end cards become single source assets. It also helps teams maintain consistent standards across multiple editors, since sub projects can be versioned and shared independently.
True Time Timeline Editing with Primary and Secondary Timelines
The ability to manage multiple compound clips through tabs, and to switch between primary and secondary timelines, addresses the common pain of editing complex projects with many nested elements. The primary timeline acts as the master assembly. Secondary timelines allow you to work on focused sections without digging through layers of tracks or losing context. Tabs offer a clean way to jump between these domains. In effect, this is like bringing the concept of nested sequences front and centre in the interface, with faster switching and clearer management.
Use this when your project has a main narrative flow and several detailed sequences that need care, such as an animated intro, a layered tutorial with picture in picture, and a credits reel. Place each into a secondary timeline tab. Edit them in isolation, then assemble in the primary timeline for overall pacing and transitions. The cognitive load diminishes, and performance often improves because you are not rendering the entire universe while tweaking one section.
Dynamic Captions and Batch Text Processing
Subtitles and captions are central to accessibility and engagement, and Filmora 15 improves the experience with dynamic captions. The workflow for editing subtitle text is more fluid, with better tools for batch processing changes across multiple entries. For example, if you decide to adjust font, colour, or positioning across all captions, you can do so more quickly. The addition of new animation effects also introduces subtle ways to bring captions to life in short form content, where text is often a primary hook.
Creators producing shorts for platforms like TikTok, Instagram, or YouTube have a particular need for legible, punchy captions. Look for presets that draw attention without becoming gaudy, and remember that captions should support the audio without competing for it. If you mix dynamic captions with the pen tool shapes, you can generate branded callouts that elevate format consistency.
Smart Cutout Improvements
Smart Cutout in previous Filmora versions was already helpful for isolating subjects or removing backgrounds without manual masking. In 15, the interaction model is upgraded to more accurately identify the user’s intention for selection, particularly around edges that may be smudged or soft. This translates into cleaner outlines and less time painting around hair, fabric, or intricate object boundaries. That in turn makes compositing and foreground emphasis more accessible to non specialists.
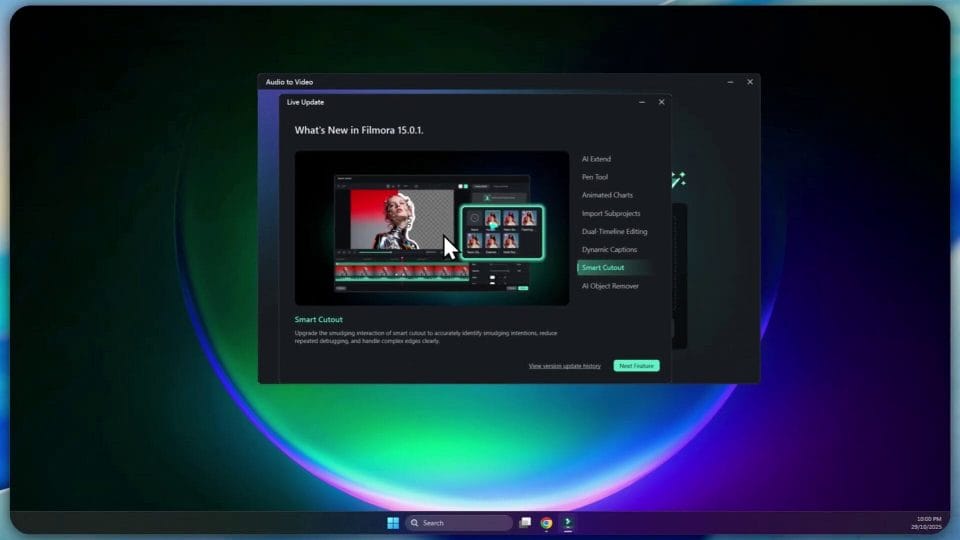
In real world editing, this would speed up production of talking head videos with graphic backdrops, product highlights where the subject stands out crisply on a colour background, and social content where the foreground needs to pop. While no automated cutout is perfect across all footage, incremental precision reduces the number of frames that demand manual correction and increases the confidence to use smart cutouts in more ambitious sequences.
AI Object Remover and Magic Box Enhancements
The AI object remover sees a full upgrade in Filmora 15, and references to a magic box for quick removal suggest a simplified interface for targeting watermarks, subtitles, people, or distractions that pull focus. With this tool, you can clean up a shot by removing unwanted passers by, signage distractions, or overlay artefacts that got baked into a recording. It will not make every removal flawless, but the ease of use will open up new options during edit when reshooting is not practical.
A brief word on ethics and legality. It is tempting to remove watermarks or copyrighted subtitles from third party material. Make sure your usage complies with legal requirements and platform policies. For your own footage, the tool is ideal for making cuts cleaner, eliminating accidental background chatter, or tidying up busy frames so the viewer’s eye goes where you want it.
Audio to Video
Filmora mentions a use case for turning audio into video, which hints at a feature that can pair an audio track with visual elements automatically to create short videos. This is appealing for podcasters and social creators who want to repurpose clips without shooting B roll. With dynamic captions and animated charts available, you could combine a compelling sound bite with visualised emphasis, such as waveform overlays, title animations, and a simple background treatment. For brands and educators, this lowers the barrier to sharing insights quickly in feed formats.
Exploring the Interface in Practice
Back in the application, the core layout is similar to 14, which helps you focus on trying new tools rather than relearning navigation. One of the prominent additions is a new button for AI Extend. The captions panel looks familiar but gains the dynamic tools discussed earlier. If you are coming from 14, this is a friendly welcome with just enough novelty to signal growth.
Opening a New Project and Finding the Pen Tool
When launching a new project, Filmora surfaces seasonal promotions and store content in a non intrusive panel. During this test, a Halloween promotion appeared offering a discount, a reminder of the marketplace integration for assets and plugins. Skip past if you want a clean edit window. Then comes the search for the pen tool. It is positioned among effects and overlay tools and flagged with an on screen note about drawing shapes and paths. If you do not see it immediately, check the graphics section or use search in the effects panel. Filmora often organises creative tools alongside media elements rather than isolating them in a separate drawing palette.

At this stage, it is worth experimenting. Draw a simple line, add keyframes, and watch how the motion behaves with ease in and ease out settings. Then test an arc and a closed shape. Add a fill colour and stroke, and place the shape above a clip to see how it sits in a composition. Bring in a title and align it with the shape for a stylish lower third. Save this as a reusable asset and build a small brand kit within Filmora so every new video starts faster.
Importing Sub Projects and Verifying Assets
The Import Sub Projects command sits under the project or media import menu and adds selected project files as compound clips. Choose a previous project that contains a set of transitions, a signature intro, or a carefully edited tutorial segment. Import it and verify that all the internal tracks appear as one block in your current timeline. Then open it in its own tab and confirm that you can edit within the compound clip. This makes reuse far more efficient and reduces the temptation to render out intermediate files that lose editability.
One of the first things I checked after installing Filmora 15 was whether my custom assets were retained. Templates, graphics, colour lookup tables, and audio files that I created or curated are core to my workflow. Filmora passed this test. My custom graphics showed in the user library. My audio files, including original recordings and licensed tracks, remained available. This reassures me that the installer does not prune user content and that upgrading can be done without risky migration steps. Even so, always keep backups of your project directories and exported templates before a major upgrade. A simple copy to an external drive is enough to sleep well.
Performance on Older Hardware
On the Metabox laptop, Filmora 15 behaves like a well optimised successor to 14. Timeline scrubbing on a multi track project with colour adjustments and a few effects felt smooth. The preview window ran without frequent drops in complex segments. Export times were consistent with 14, with a slight improvement on sequences that feature compound clips and dynamic transitions. GPU acceleration takes some load off the CPU during effect rendering, and the generous memory capacity helps with caching. If your machine is similar or slightly leaner, expect Filmora 15 to be workable for short and medium length projects without forcing proxy workflows by default.
For heavy footage such as high resolution, high bit rate material, consider enabling proxy generation for a painless edit experience. Filmora makes this easy and transparent, and switching proxies on and off for export is smooth. The environment test at the start is a good indicator of compatibility, but the actual bottleneck tends to be disk speed and GPU capacity when stacking effects. External SSDs for media also help, especially when juggling multiple sub projects with large asset sets.
User Interface Details and Small Quality of Life Changes
Beyond the headline features, Filmora 15 exhibits small touches that make the daily edit a little more pleasant. Buttons and labels are crisp. Panels respond promptly. The settings for captions and graphic shapes are logically grouped, and there is a sense of patience in the design that waits for you to discover tools rather than waving them aggressively. When new features appear, such as AI Extend and dynamic captions, they nestle into existing panels in ways that feel natural.
Search within the media and effects libraries seems snappier in this build, although that can be subjective based on library size. The tabs for compound clips and secondary timelines free you to segment your attention neatly, which is a boon during complicated assembly. If you spend long hours editing, small friction removals add up to real time gains over months.

Pricing and Promotions
On launch, Filmora surfaces store promotions along the lines of seasonal discounts. During this early test, a Halloween offer appeared. Filmora’s pricing typically offers options for annual licences and lifetime plans. If you are mid licence, check upgrade eligibility, especially if you purchased recently. The value question is whether the new features will save you time or enable content you would otherwise outsource. For many creators, the combination of AI enhancements, better project management, and dynamic captioning makes a compelling case to move up to 15.
Tips for Early Adoption
Here are some practical suggestions as you move into Filmora 15:
Start with a copy of an existing project. Import it and compare behaviour for transitions, colour presets, and audio effects. This reduces surprises on a client piece.
Create a small test project that touches each new feature. Try AI Extend on B roll, build a graphic with the pen tool, import a sub project, edit in a secondary timeline, and apply dynamic captions to a short clip. This exercises the new components in a low risk environment.
Back up custom assets. Even though Filmora retained mine, it is wise to keep a copy of templates, overlays, and LUTs on an external drive.
Explore the store and plugin catalogue after you have a handle on the included tools. New capabilities often pair well with curated packs that match your aesthetic.
Monitor hardware behaviour. Check CPU and GPU usage while applying AI features. If your machine runs hot, adjust preview quality or consider proxy generation for complex sequences.
Who Benefits Most from Filmora 15
Creators who juggle recurring formats, multiple series, or collaborative edits will find the sub project import and compound clip management particularly helpful. Educators and business communicators will appreciate dynamic captions and the pen tool’s chart animations for clarity and polish. Social video makers who rely on punchy B roll and precise timing can leverage AI Extend and smarter cutouts to finesse content without reshoots. If your current workflow is mostly linear with minimal graphics or text, you will gain from efficiency improvements but the step change is largest where you actively use the new toolset.
Final Thoughts
Upgrading to Filmora 15 feels intuitive and steady rather than disruptive. The installation proceeds without drama, personal assets remain intact, and the familiar interface welcomes you with thoughtful additions. The What is new list is not fluff. AI Extend, the pen tool, sub project import, multiple timeline tabs, dynamic captions, smart cutout improvements, and the upgraded object remover together form an appealing package that addresses real creative and organisational needs.
As with any editor, the proof is in sustained use over several projects. Early impressions are positive. Filmora 15 seems comfortable on older hardware, and the new features find practical places in daily edit routines. For those on Filmora 14 who value stronger project management and richer native graphics, stepping up to 15 is sensible. For newcomers, the breadth of intuitive tools makes Filmora a friendly platform for learning while still offering room to grow into complex edits.
There is a clarity in this release. Filmora is leaning into AI where it helps you bridge gaps and clean frames, adding native graphics tools to reduce reliance on external apps, and supporting multi project workflows so you can scale without chaos. If that aligns with your creative goals, Filmora 15 deserves a place on your shortlist for the next production cycle.

Marco / admin / 30 Nov
Writing day to day ramblings about making money, business, technology, sharing awesome deals and everything else that I know I'll forget. Follow my personal blog https://marcotran.com.au
I've recently also turned Vegan and started this website Veggie Meals - check it out
"When technology speaks for itself, that is art" - MT
Affiliate Compensated: there are some articles with links to products or services that I may receive a commission.
OTHER ARTICLES YOU MAY LIKE

EASY TYRE PRESSURE SENSOR RESET TUTORIAL | RENAULT KOLEOS & SIMILAR CARS
If you have recently adjusted your tyres, topped up the air pressure, or seen a warning appear on your dashboard, knowing how to reset the tyre pressure monitoring system on a Renault Koleos can save you time and unnecessary worry. The process is quite straightforward once you know where to look in the vehicle menu, […]
read moreHOW TO USE GOOGLE WORKSPACE STUDIO FLOW IN GMAIL FOR SMART EMAIL AUTOMATION
Google keeps slipping new productivity features into Workspace, and sometimes the most useful ones are the tools you almost discover by accident while checking email. That is exactly the case with Studio Flow, a feature that has started appearing inside Gmail and wider Google Workspace environments, and it looks like Google is pushing further into […]
read more