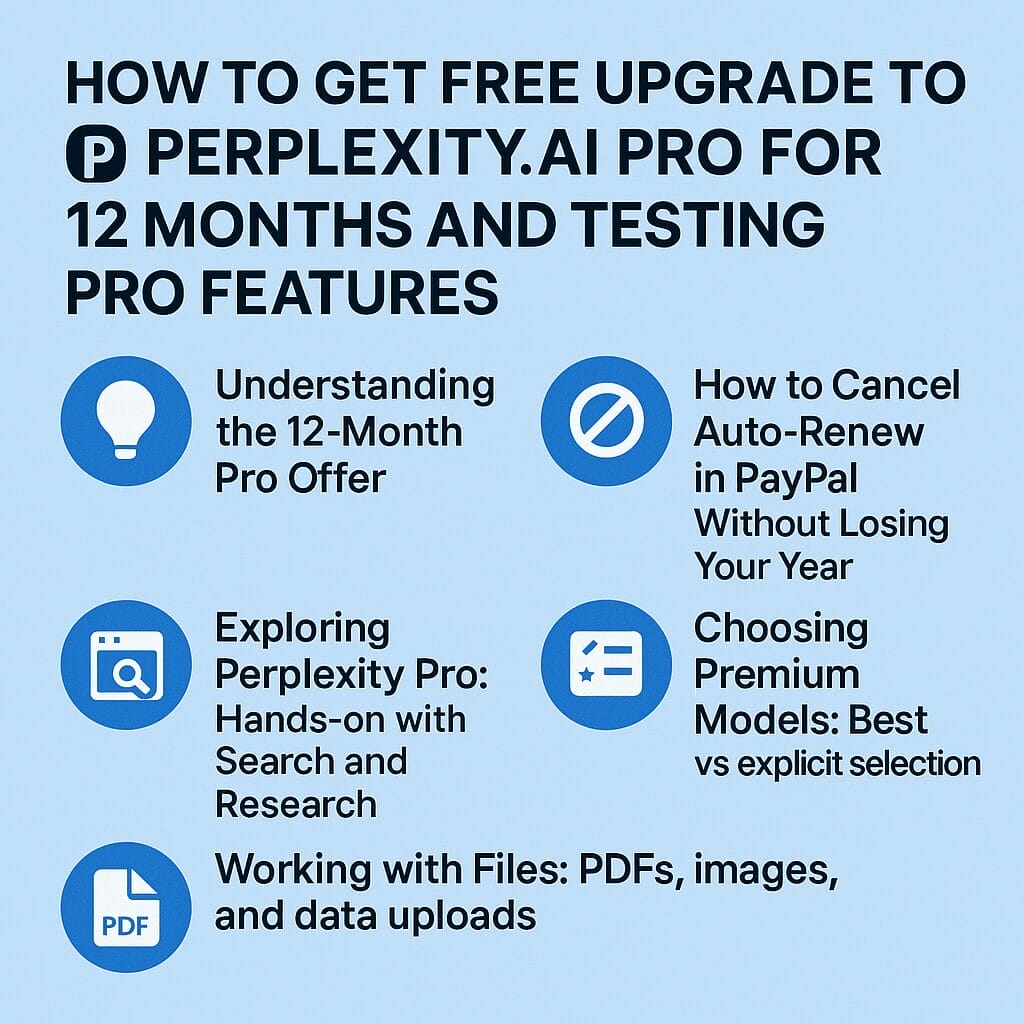
HOW TO GET FREE UPGRADE TO PERPLEXITY.AI PRO FOR 12 MONTHS AND TESTING PRO FEATURES
September 9, 2025 / by Marco / Categories : ai, Business, Technology
If you spend time researching, comparing, or synthesising information online, you have probably encountered Perplexity.ai — a research-focused assistant that blends large language models with live web search and citation trails. The Pro plan supercharges that experience with priority access to powerful models, higher usage limits, and premium capabilities baked directly into the interface. Right now, there is (or recently has been) a special path to secure 12 months of Perplexity Pro at no upfront cost by connecting your PayPal account. In the sections that follow, you will find a detailed, practical walkthrough to claim the offer, manage auto-renew settings sensibly, verify your Pro status, and then systematically explore the Pro-only features in real-world scenarios.
Rather than a cursory overview, this guide goes deep: step-by-step pages, what to click and why, what to expect in the interface, the difference between Search and Research modes, models and citations, file uploads, image generation, and even how to think about the $5 API credits that come with Pro. The goal is to equip you not only to upgrade successfully but also to make the most of those 12 months.

Understanding the 12‑Month Pro Offer
The essence of the offer is simple: connect your existing (or newly created) Perplexity account to PayPal via a dedicated promotional join page, claim the upgrade, and you’ll receive a full year of Pro access. The Pro plan gives you expanded access to premium models and tools with increased limits. You can begin using Pro features right away once the claim completes and your account reflects the new status.
A few important points underpin how the promotion typically works:
- You need a Perplexity account. If you do not have one, register for free in a minute or two.
- You must use a specific join link within Perplexity to claim the 12‑month offer and connect PayPal. The exact wording of the promotional URL can vary over time; always follow the official in-product link or a trustworthy source from Perplexity so that you land on the correct page.
- The subscription associates with your PayPal account. This is the mechanism that activates the offer and sets up the renewal profile at the end of the term. If you do not wish to be billed when the year ends, you can cancel the automatic payment in PayPal while keeping your Pro benefit for the remainder of the promotional year. You will find a full walkthrough below.
- Availability can vary by region or over time. Offers like this may be limited or revised. If you do not see the claim button, that usually indicates the promotion is not available on your account or has ended, in which case defer to what you see in the official interface.
Once you are on the right page, the core action is simply to click “Claim” and link your PayPal. You will see a visual confirmation in your Perplexity account status when the upgrade has taken effect.

Step-by-step: Claim the 12‑month Pro plan
Here is a clear sequence you can follow to claim and confirm your upgrade:
- Log in to your existing Perplexity account (or create a new one) on the official site.
- Navigate to the promotional join page for PayPal-linked Pro. If you arrived via a link, verify the domain and that you are signed into the correct Perplexity account before proceeding.
- Look for the button or callout that references “Claim 12 months of Perplexity Pro” and click it.
- On the PayPal authorisation screen, confirm the merchant and the terms displayed. Ensure the PayPal account you use is the one you want associated with the subscription profile.
- Complete the connection process and wait for the success message. You should see a confirmation back in Perplexity that your plan is now Pro.
Once complete, Pro status appears in multiple places of the interface, making it easy to confirm you’re on the correct plan.

Where to check your Pro status in Perplexity
Visual confirmation helps eliminate uncertainty, especially right after you complete the claim. Here is where you can look:
- Within the conversation or home interface, look for a Pro indicator toward the bottom or in the plan area. It may be styled as a badge, a label, or a small tag indicating your plan.
- Open your account or settings panel. In the billing or plan section, it should clearly state “Perplexity Pro”. This is also where you can review plan details, check renewal dates, and, in some cases, download invoices.
If you do not see these indicators, sign out and sign back in, or refresh the page to force a status sync. In normal circumstances, the upgrade is immediate; if there is any delay, it is typically short-lived and resolved by a refresh.
How to Cancel Auto‑Renew in PayPal Without Losing Your Year
Connecting your PayPal sets up a subscription profile. If you want to enjoy the 12 months without being charged afterwards, you can cancel the merchant’s automatic payment in your PayPal account while still retaining Pro benefits until the end of the promotional term. This distinction matters: cancelling automatic payments in PayPal prevents future renewals but does not typically revoke the current year you have already claimed.
PayPal’s interface uses the terminology “Automatic payments” or “Preapproved payments.” You can manage merchants individually and cancel them at any time. Here is how you do it:
- Go to PayPal and sign in to the account you linked to Perplexity.
- Visit your automatic payment management area. This is typically reachable via a URL akin to paypal.com/myaccount/autopay or by navigating through Settings and selecting “Payments” followed by “Manage automatic payments.”
- Find “perplexity.ai” (or the exact merchant name shown at the time of authorisation) in the list of active merchants.
- Select that merchant to view details and click “Cancel” or “Cancel Automatic Payments.”
- Confirm the cancellation. The status should update to reflect that no further payments will be taken when the term ends.

A few practical tips when cancelling auto‑renew:
- Take note of the “Next payment” date shown by PayPal. After cancelling, that next payment entry should either disappear or change status, indicating that no future payment will be charged.
- You should receive an email from PayPal confirming that you have cancelled automatic payments to the merchant. Keep that email for your records.
- Return to Perplexity and refresh your session. Your plan should still show “Pro.” The cancellation simply prevents renewal at the end of the period.
After you have cancelled the automatic payments, your subscription remains active on the Perplexity side for the entire year. It is good practice to verify this visually right away.
Confirming you remain on Pro after cancelling auto‑renew
If you refresh the account or the main interface, you should continue to see your Pro status showing as active. This is because the automatic payment profile in PayPal only controls future charges; the current term remains intact. If you ever notice a discrepancy, contact Perplexity support with your subscription details.

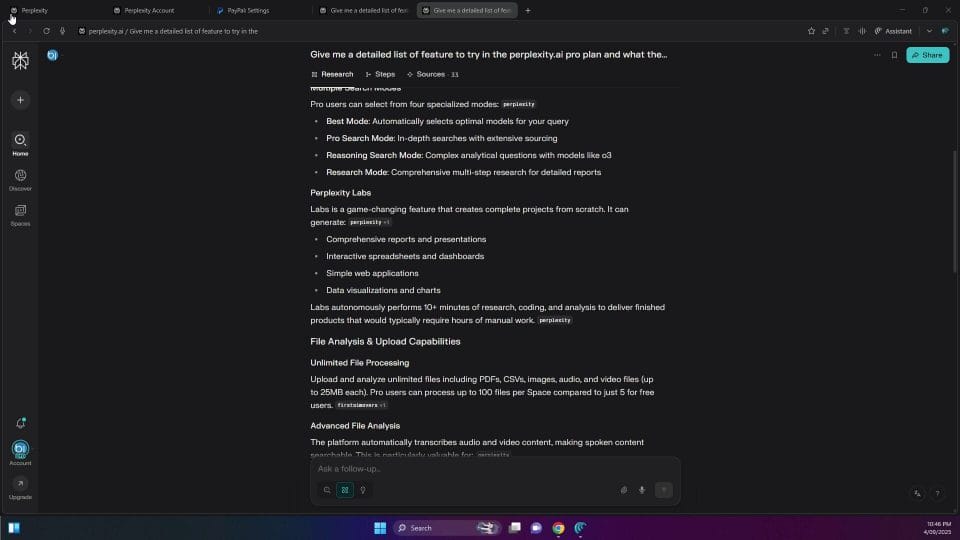
Exploring Perplexity Pro: Hands‑on with Search and Research
Once your upgrade is live, the real value is in using the Pro features. Start with the two complementary modes you’ll use most often: Search and Research. Both are designed to help you ask better questions and get answers supported by sources, but they behave differently in speed, depth, and presentation.
Pro‑enabled Search mode
Begin by opening a new tab or a fresh conversation in Perplexity and entering a prompt. For example, you might ask: “Give me a detailed list of features to try in the Perplexity.ai Pro plan and what the benefits are.” In Pro, Search mode is “Pro‑enabled” by default; you may see messaging that it uses powerful models and increased limits to query more sources and structure a concise response efficiently.
Some characteristics to note in Pro Search:
- Speed and focus: It prioritises quick, relevant synthesis over exhaustive analysis.
- Citations: You typically see a neat list of sources beneath or alongside the answer. Click any citation to open the underlying webpage and validate the claim in context.
- Structured summaries: For many queries, Search will supply a summary table or bulletised comparison that makes it easy to scan.
- Higher limits: Pro relaxes daily limits, supports more queries, and unlocks premium model access, reducing interruptions or fallbacks you might see on the free tier.

When investigating a feature set or comparing plans, the Search response often contains a side‑by‑side view or quick summary that highlights what you gain by moving from Free to Pro. While not every query yields a table, the Pro tier tends to deliver cleaner structure more often.

Use Search mode whenever you need a high‑quality, source‑backed answer quickly. It’s ideal for:
- Clarifying concepts or definitions with references
- Getting a compact summary with outbound links to read more
- Triaging research questions before committing to deeper analysis
- Building a quick outline of an article, proposal, or study plan
Research mode for deeper, slower synthesis
Now, try the same prompt in Research mode. Open a new tab or click into Research, paste your prompt, and run it. You will likely see a notice that it will take longer — even a few minutes — to gather sources and compile a full report. This is expected behaviour for a deeper, multi‑step analysis pass that consolidates more material.
What to expect in Research mode:
- Longer runtime: It may indicate a timeline (for instance, “about three minutes”).
- More sources: Research mode can aggregate significantly more references than Search mode. For example, where a Search response might cite a dozen sources, Research might surface several dozen to underpin a more comprehensive write‑up.
- Different presentation: Research may skip the tidy summary table and instead deliver a structured long‑form synthesis with sections, key findings, and a larger bibliography.
- Better for complex questions: When you ask multifaceted questions (e.g., policy analysis, multi‑criterion comparisons, or literature‑style reviews), Research aims to produce a richer report.

In side‑by‑side usage, you might notice the following trade‑offs:
- Search produced 10–12 sources and a clear comparison table, which is excellent for quick scanning and decision‑making.
- Research produced several dozen sources, more narrative detail, and deeper context at the expense of runtime and the tidy tabular summary.
As a practical rule: use Search to scout, and use Research to write. Start with Search to establish the lay of the land; escalate to Research when you are ready for depth and breadth. Pro’s increased limits and model access let you do both more freely.
Choosing Premium Models: Best vs explicit selection
Perplexity can choose a model automatically based on your query (“Best”) or let you explicitly pick from the premium models available to your plan. In Pro, you can open the model selector (usually via a “Choose a model” or similar button) and either leave “Best” enabled or deselect it to choose a specific model. Model availability can change over time and by region or plan.
When you manually choose a model, you might observe a few behavioural differences:
- Source citation behaviour can change when a pure language model is selected without retrieval augmentation. In those cases, you may see fewer or no inline citations compared with Perplexity’s Search/Research workflows, which are optimised for sourcing.
- The tone and structure of the response may differ slightly depending on the model’s strengths. Some models bias towards creative elaboration, others towards concise factuality.
- Latency and token handling can vary; powerful models might take longer but deliver more nuanced reasoning, while lighter models can be snappier for straightforward tasks.
In the demonstration flow, the narrator selected a specific model from the list and observed that, unlike the earlier Search run, the response did not cite sources. This is a useful reminder: when traceable citations matter — for academic work, professional briefs, or compliance‑sensitive tasks — stick with Search or Research (or leave “Best” enabled) so the system remains retrieval‑augmented and citation‑aware. If you are brainstorming, drafting, or exploring conceptual territory where citations are less critical, selecting a premium model directly can be perfectly appropriate and sometimes stylistically preferable.
To get the most from model selection:
- Default to “Best” when you are unsure. It lets Perplexity route your query intelligently.
- Switch to a particular model if you have a reason — e.g., you want a more creative style, you are testing consistency across models, or you prefer how a given model responds to your domain language.
- If citations are missing in a manual selection but you need them, re‑run the query in Search mode or flip back to “Best.”
Working with Files: PDFs, images, and data uploads
One of the most powerful aspects of Perplexity Pro is the ability to attach files directly to a query. When Pro is enabled, you will see options to attach from local storage or connect to cloud sources such as Google Drive or Dropbox. This opens a wide range of workflows:
- Upload PDFs (white papers, reports, e‑books) and ask for summaries, bullet‑point briefs, or targeted extractions (e.g., “Extract all dates, figures, and named stakeholders from this document”).
- Attach images and request descriptions, comparisons, or structured data (e.g., “Describe each chart, the axes, and the high‑level insight”).
- Upload CSVs and explore trends, outliers, and derived metrics; ask for descriptive statistics and even get suggestions for appropriate graphs or chart types.
Practical advice when using file uploads:
- Be specific in your prompt. For a PDF summary, specify the intended audience and length (e.g., “Summarise for a non‑technical executive in 10 bullets”).
- Use follow‑up questions to refine. If the initial summary omits a crucial section, reply with “Focus on section 4 and the cost breakdown; include any caveats mentioned in the footnotes.”
- For CSVs, mention the columns that matter. For example: “This CSV includes date, region, product, revenue, cost. Compute monthly gross margin by region and flag months with a margin below 20%.”
- If you connect cloud storage, ensure appropriate permissions and consider creating a folder specifically for documents you are comfortable sharing with the assistant. Keep sensitive materials compartmentalised.
Depending on the model path Perplexity uses, you may also be able to request simple visualisations or at least instructions on how to create them in your favourite tool. If chart rendering is not directly available in your current session, ask for a step‑by‑step guide (e.g., “Provide the Python and Pandas code to generate a line chart of monthly revenue by region, with annotations for anomalies”).
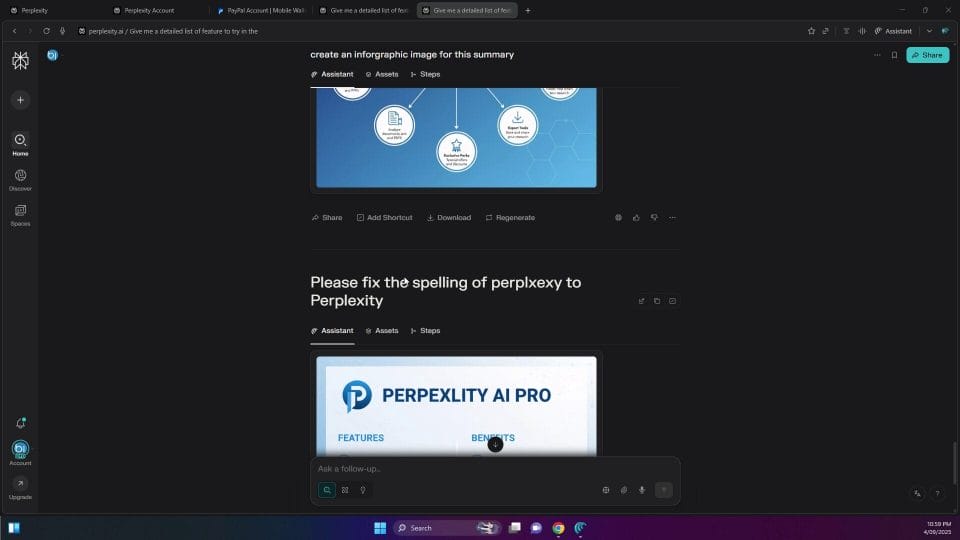
Image Generation: What works well and what to watch out for
Pro unlocks image generation within the same workflow. You can ask Perplexity to “Create an image for a graphics image for this summary” and it will attempt to produce a visual. The generation itself is often swift, and for many creative tasks — icons, concept sketches, hero images — the results can be surprisingly effective.
However, one recurring limitation of many image generation models is accurate text rendering inside the image (e.g., brand names, headings, and labels). In the demonstration, the generated image contained misspellings of “Perplexity,” and even when prompted to fix the spelling, the subsequent image still carried typos. This behaviour is common: the model may reinterpret your instruction and produce a new visual rather than editing the underlying lettering pixel‑accurately.
Strategies to handle text in generated images:
- Avoid embedded text when possible. Ask the model to produce a clean, text‑free graphic with space reserved for titles and labels, which you can add later with a design tool (e.g., Figma, Canva, Affinity, or Photoshop) to guarantee perfect spelling and branding.
- If you must include text, provide the exact string and casing (e.g., “Use the exact text ‘Perplexity Pro’ in title case”). Even then, expect occasional misspellings and be prepared to iterate or edit afterwards.
- Ask for a layout guide instead of final artwork. For instance: “Design a composition for a blog header: left‑aligned title area 1200×300 px, abstract geometric background on the right; no text. Provide a description of colours and shapes.” Then implement that layout in your own tool.
- When the model supports it, you can sometimes request a second pass that “keeps composition but corrects this specific typo,” but results vary depending on the backend model and session capabilities.
In short, treat AI image generation as a rapid ideation tool, not a final text‑perfect compositor. Iterate quickly, then add or correct type manually for production‑ready results.
Iterating on image prompts effectively
Better prompts yield better images. Think in terms of content, style, and constraints:
- Content: Describe what must be in the image (“A minimal, abstract background inspired by data networks and research”).
- Style: Specify influences or adjectives (“Flat illustration, cool palette with teal and navy, subtle gradients, high contrast, modern”).
- Constraints: Define orientation, space for overlays, and what to avoid (“16:9, leave the left third mostly empty for text; avoid including any text in the image itself”).
If you receive an image you like compositionally but dislike in colour, ask for a palette shift. If the layout is correct but the hierarchy feels off, ask to emphasise certain elements (“increase the size of the central shape; soften background noise”). These constraint‑driven iterations tend to produce more controllable progress than trying to fix literal typography inside the generated image.
API Credits: Using the $5 allowance responsibly
As part of Pro, you may receive $5 worth of API credits, which you can use to experiment with programmatic access. This is an excellent way to prototype small utilities or integrations that leverage Perplexity’s capabilities inside your own tools. To get started, you typically need to create an API key in your account’s developer or integrations section. Keep this key secure; treat it like a password.
What can you do with $5 of credits? While exact costs depend on the models and endpoints used, here are practical, low‑footprint ideas:
- Build a command‑line research helper that takes a question and prints a citation‑backed summary to your terminal.
- Create a lightweight web form for your team where they can upload a PDF and receive a structured brief with key takeaways and links.
- Prototype a spreadsheet add‑on that highlights anomalies in CSV data and suggests follow‑up questions to investigate.
Tips for staying within the allowance:
- Cache results during testing to avoid re‑querying the same prompt repeatedly.
- Start with small prompts and focused outputs, then scale up as needed.
- Add simple rate limits and guardrails in your code to prevent accidental loops or runaway requests.
If you plan to build something more substantial, treat the $5 as a risk‑free trial. Measure what a typical request costs, estimate your monthly usage, and decide whether a paid tier or usage cap makes sense for your particular scenario after the trial period.
Putting Pro to Work: A practical research workflow
With the fundamentals in place, here is a structured way to conduct robust research using Pro capabilities end‑to‑end:
- Frame the question precisely in Search mode. Use a single sentence that captures your core need, followed by a bullet list of specific sub‑questions. For example: “How does Perplexity Pro differ from the Free plan for academic research?” Then list “citation handling,” “source diversity,” “limit differences,” “model options,” and “file analysis.”
- Scan the Search results. Click citations that look most authoritative (official docs, respected publications, recent write‑ups). Open them into new tabs.
- Promote the topic to Research mode when you need a full brief. Paste the refined prompt and let it run. Expect a slower, more comprehensive output.
- Use follow‑ups to fill gaps. If Research omitted a specific angle (e.g., “CSV upload and trends”), ask directly: “Extend the report with a section on CSV analysis workflows. Include step‑by‑step prompts and common pitfalls.”
- Attach files to personalise the analysis. Upload a sample PDF (e.g., a literature survey) and request a comparison with the earlier report: “Integrate findings from this PDF and reconcile any contradictions.”
- Save or export the thread. Prolonged research is easier to revisit when your sources, summaries, and refinements live in one place.
This workflow maximises both breadth and traceability. Start broad with Search, dive deep with Research, tailor with file uploads, and maintain a cohesive thread you can reference later. If you need a quick graphic, generate an image draft and add text manually in a design tool. If you want to automate recurring tasks, use your API credits to prototype a helper that encapsulates your prompts and post‑processing.
Troubleshooting the upgrade and subscription steps
While most users complete the upgrade in minutes, here are common issues and how to resolve them:
“I don’t see the claim button”
Promotions can be time‑limited or region‑specific. If you are on the correct join page and logged into the right Perplexity account but the claim button is absent, the offer may not be available to you at this time. You can try the standard Pro upgrade path or check back later to see if the promotion reappears.
“PayPal shows an error while linking”
If PayPal declines the authorisation, verify the following:
- Your PayPal account is in good standing and can set up subscriptions.
- Your country and currency settings are compatible with merchant subscriptions.
- Any security checks (two‑factor authentication, identity verification) have been completed.
Try again after confirming your account status. If the issue persists, contact PayPal support, as the block is likely on the payments side rather than Perplexity.
“I cancelled auto‑renew, did I lose Pro immediately?”
No — cancelling the automatic payment stops future charges, but your current term remains active. Refresh Perplexity and check your plan status; it should still show Pro. If it does not, reach out to Perplexity support with your PayPal cancellation confirmation so they can verify your entitlement for the remainder of the year.
“Where exactly is the auto‑payments page in PayPal?”
Interfaces can shift over time, but the simplest approach is:
- Log in to PayPal.
- Go to Settings or the Payments tab.
- Select “Manage automatic payments.”
- Find the merchant (e.g., “perplexity.ai”) and choose Cancel.
You can also try visiting the direct path commonly used for autopay management (for example, a route like paypal.com/myaccount/autopay) and then select the merchant from the list shown. If you do not see Perplexity listed, confirm you used the same PayPal account you connected during the claim.
“My account does not reflect Pro after claiming”
First, refresh your browser tab and ensure you are logged into the same Perplexity account used at claim time. If the problem remains:
- Sign out and sign back in.
- Clear the browser cache or try an incognito/private window.
- Check your email for a confirmation notice and ensure no verification steps are pending.
- Contact Perplexity support with the timestamp of your claim and any PayPal confirmation you received.
Mastering Citations and Source‑aware Answers
One of Perplexity’s core strengths, especially compared with generic chat models, is that it cites sources. This is essential for research and professional writing. Pro does not change the concept of citations, but it improves your experience by enabling deeper retrieval, more sources, and higher throughput.
How to leverage citations effectively:
- Always click through to primary sources for critical facts, dates, or data. The summary can guide you, but the full context still matters.
- Check publication dates on sources. When comparing product features or pricing, older sources may be outdated. Ask Perplexity to prefer recent sources or filter by date if needed.
- Cross‑verify contentious claims with at least two reputable sources. If the first two sources disagree, ask Perplexity to reconcile the difference explicitly and identify which source appears more reliable and why.
- Ask for a bibliography or a list of links at the end of a Research mode output. This provides a clean set of references for your writing or reporting workflow.
If you switch away from Search/Research to a manually selected model and citations disappear, remember to switch back when traceability matters. Source‑aware answers are the backbone of credible research output.
Prompt Craft for Better Answers in Pro
Even with enhanced model access and higher limits, your prompt still determines the quality of the outcome. Some patterns work consistently well in Pro:
- Context + Objective + Constraints. For example: “I’m preparing a briefing for clinicians about AI research tools. Objective: explain how Perplexity Pro supports evidence‑based queries with citations. Constraints: UK English, under 400 words, avoid jargon.”
- Enumerate sub‑questions. “Answer the following sub‑questions: 1) What’s the difference between Search and Research? 2) When should I pick a model manually? 3) What are typical file workflows?”
- Specify the output format. “Provide a 3‑paragraph summary followed by a 5‑item bullet list of key takeaways, each with a citation.”
- Request disambiguation if necessary. “Before answering, ask me two clarifying questions if any part of the request is ambiguous.”
In follow‑ups, refer to what you liked or disliked in the previous output. “The summary was good, but I need more emphasis on limitations. Add a section explicitly listing what Pro cannot do or where it might struggle.” This iterative approach compounds improvements.
When to Use Search vs Research in Practice
Choosing between Search and Research is partly about scope and partly about time. Here are practical scenarios:
- Use Search to quickly understand a new tool’s pricing or feature tiers, with links to official pages for verification.
- Use Search to scan breaking news and get a compact, linked digest without wading through multiple sites.
- Use Research to compare frameworks or methodologies across multiple academic or technical sources, producing a long‑form report you can share.
- Use Research to synthesise best practices from standards documents, white papers, and case studies, collating a reading list at the end.
If you are unsure, start with Search — it is fast, lightweight, and reveals whether the topic is simple enough for a quick answer or whether it deserves the extra time of a Research run.
Understanding why some model responses lack citations
In the demonstration, a model was manually selected and the output arrived without citations, unlike earlier Search runs. This typically happens when the response is generated by a general LLM pathway rather than a retrieval‑augmented flow. Retrieval‑augmented generation (RAG) enriches the prompt with document snippets and metadata from web or internal sources, allowing the assistant to point to where facts came from. When you bypass that retrieval layer and go straight to a raw language model, you get fluent text but often without provenance.
Practical guidance:
- When you need facts with a trail, use Search or Research. They’re tuned for sourcing and will usually list references.
- When you want brainstorming, drafts, or stylistic variations, a direct model selection is fine.
- If you are midway through a thread and you’ve switched models, a quick reminder prompt like “Cite sources for each key claim” can sometimes add links if retrieval is still available. If not, re‑run in Search.
Common pitfalls and how to avoid them
Even with a powerful toolset, a few predictable pitfalls can slow you down. Here’s how to sidestep them:
- Overly broad prompts. “Tell me everything about AI” will produce something generic. Narrow your scope or split into sub‑questions.
- Ignoring the citations. A beautifully written answer can still contain an outdated figure if you don’t check the sources. Click through and skim for context.
- Expecting pixel‑perfect text in generated images. As discussed, treat image generation as concept art; add correct text afterwards.
- Forgetting to cancel auto‑renew if you intend a one‑year ride. Put a calendar reminder or cancel the auto payment as soon as you claim the offer.
- Uploading sensitive files without thinking. Keep confidential documents in a separate, controlled environment. If you must analyse sensitive data, anonymise it first.
Verifying limits and capabilities without over‑reliance on memory
Because Pro unlocks higher usage and premium features, it can be tempting to assume “no limits.” In practice, limits may still exist — they are just higher or more flexible. If you are planning critical work (e.g., a large research sprint or bulk file analysis), it is wise to:
- Plan your prompts and file selections in batches.
- Monitor the session for any rate or quota notices.
- Keep an eye on performance; if a mode is taking too long, consider whether Search answers would suffice before escalating to Research.
If you are experimenting with model selection, record your observations: which model responded fastest, which produced the best structured output, and which adhered most closely to your formatting constraints. These notes will help you pick the right combination the next time without guesswork.
A closer look at the example prompts and outcomes
In the demonstration flow, a baseline prompt was used repeatedly to test different features: “Give me a detailed list of features to try in the perplexity.ai Pro plan and what the benefits are.” Running this in Search yielded sourced, structured comparisons. Running it in Research delivered a longer, more exhaustive report that took more time and referenced significantly more sources. Selecting a premium model manually produced a fluent answer that did not include citations by default, illustrating the difference between RAG‑style and pure LLM responses.
For your own testing, adopt a similar strategy: pick a single prompt and run it across modes and models. Observe:
- How much time each mode takes
- How many sources are cited
- Whether a summary table appears
- How actionable the output is without further prompting
Then pick a second prompt that involves file handling — for example, attach a PDF and ask for a domain‑specific summary — and repeat the exercise. This quickly builds intuition for when to use which capability and how to phrase follow‑ups.
Quality control: turning outputs into deliverables
Perplexity Pro excels at rapid synthesis, but turning outputs into finished deliverables still benefits from human review and refinement. Adopt a light but consistent QC process:
- Scan for outdated references; update links when newer sources are available.
- Check for internal consistency. If the summary claims one thing but a citation implies another, ask Perplexity to reconcile the discrepancy and explain why the stronger source prevails.
- Adjust tone for the target audience. For a policy memo, remove colloquial phrasing; for a blog post, you might add analogies and examples.
- Standardise formatting. Request headings, bullet lists, and callouts in a template format you can reuse for future research briefs.
With a few minutes of QC, the jump from AI‑assisted research to polished output becomes predictable and reliable — particularly useful over a full year of Pro access.
Testing edge cases: what if the model misinterprets?
As with any AI system, occasional misinterpretations happen — especially with ambiguous prompts or domain‑specific acronyms. When you notice drift, try these corrective moves:
- Clarify the scope. “By ‘Pro features’ I mean features only available on the paid plan, not general search capabilities.”
- Provide an example. “For instance, the ability to attach PDFs and request a structured summary.”
- Constrain the output. “List 10 features, each with a one‑sentence benefit and one caution or limitation.”
- Ask for self‑evaluation. “Before you answer, list assumptions you are making about my question and ask me to confirm or correct them.”
These techniques reduce the chance of tangents and produce content that aligns with your goals. They are especially helpful when testing different models in Pro to see which responds best to your domain language.
Realistic expectations for image editing via prompts
Returning to image generation: the demonstration tried to “fix the spelling of Perplexity” in a generated image. The model responded by generating a new image with a similar concept but persisted with a typo. This is a common pattern: text rendering is challenging, and localised edits to a specific region of an image can be inconsistent without a dedicated in‑painting or editing feature that preserves composition while altering only the text area.
For workflow planning:
- Use AI to get composition and vibe right quickly.
- Export and add text in a vector tool where you control fonts, kerning, and crispness.
- If you require on‑image text from the model, keep it minimal and be prepared for retries — or remove it entirely in favour of manual typography.
This approach keeps you moving fast without getting stuck on an inherently brittle part of the image generation process.
Security and privacy considerations
When you connect PayPal and upload files, adopt sensible safeguards:
- Confirm you are on the official Perplexity domain before entering credentials or linking payment methods.
- Use two‑factor authentication on both Perplexity and PayPal where available.
- Only upload documents you are comfortable analysing in a cloud‑assisted environment. Remove direct identifiers from data where possible.
- If you connect Google Drive or Dropbox, consider creating a dedicated folder for analysis to avoid accidental inclusion of sensitive files.
These simple habits minimise risk while letting you benefit fully from Pro’s capabilities.
After the year: deciding what to do next
With auto‑renew cancelled, your Pro access will lapse at the end of the promotional year unless you choose to continue. To decide whether to renew, keep a lightweight log of how Pro enhances your work:
- How often did you hit limits (if ever) on the free tier compared with Pro?
- Did Research mode materially improve your output compared with Search alone?
- Did file uploads and analysis save measurable time in your workflow?
- Did image generation play a meaningful role in your deliverables?
- Did the API credits enable a prototype you want to expand?
At renewal time, review that log and decide whether the time saved and quality improved justifies continuing. If your usage is sporadic, you might switch back to Free and upgrade again only when you have a surge of research work. If Pro became central to your daily workflow, renewing will likely be an easy call.
A final check: your upgrade and feature toolkit
To recap the operational steps you can perform today:
- Claim the 12‑month Pro upgrade by linking PayPal on the official Perplexity join page, then verify your plan shows “Perplexity Pro.”
- Cancel auto‑renew in PayPal’s Automatic payments if you want the year without future charges. Confirm via email and by checking the merchant status.
- Use Search for fast, citation‑backed answers; use Research for deeper, longer reports. Observe source counts and presentation differences.
- Experiment with model selection, but return to Search/Research when citations matter.
- Attach files (PDF, images, CSV) to tailor analysis to your materials; prompt with clear constraints and follow‑ups.
- Generate images for concepts and layouts; add final text manually in a design tool for perfect spelling and branding.
- Spend your $5 API credits on a focused prototype; measure costs and adopt caching to stretch the allowance.
With these elements in hand, you can make the most of your 12 months on Pro — learning not just how to click the right buttons, but how to think about the tool strategically, when to demand citations, how to structure prompts for clarity, and where to involve human judgement for the final polish.
Before you dive in: post‑upgrade sanity checks
If you’ve completed the upgrade flow and your Perplexity account shows Pro features, take two minutes to lock down a smooth first day. You don’t need to touch these steps ever again, but doing them now avoids confusion later.
- Confirm the Pro badge appears consistently on desktop and mobile (or app). If one interface shows Pro and the other doesn’t, sign out and sign in again on the device that’s lagging behind.
- Open a new thread and verify you can switch between Search and Research modes. Run a tiny test prompt (e.g., “Summarise the latest UK inflation reading with citations”) to ensure the engine fetches sources without error. Repeat in Research mode for a deeper output.
- Click into account or billing settings and verify your subscription plan name and renewal date are correct. If the renewal date reflects one year from today and mentions PayPal, you’re on the right rails.
- If you intend to stop auto‑renew, make sure you have completed the PayPal automatic payment cancellation while keeping the current year active. You can validate in both PayPal and Perplexity settings (covered below).
Deep control of billing and renewal
Most people never revisit billing until renewal day. With a PayPal‑linked upgrade, you can set and forget — provided you verify two things now: the Perplexity plan status and the PayPal automatic payment profile. This ensures you enjoy the full year and avoid unwanted auto‑renew at the end.
Validate in PayPal: the automatic payment profile
Your Pro year is financed via a PayPal automatic payment (“billing agreement”). You can cancel this at any time without cutting off the current year’s service. After cancelling, PayPal will no longer authorise a future renewal charge, but Perplexity Pro remains active until the original end date.
- In PayPal, open Settings, then Payments, then Manage automatic payments. Find the merchant entry for Perplexity (or the payment processor listed in your upgrade flow).
- Open the profile, note the status, and cancel if you wish to stop auto‑renew. You’ll receive a PayPal email confirming cancellation.
- Back in Perplexity, open Billing/Subscriptions to confirm your current Pro period remains set for the full year.

Confirm in Perplexity: plan status and renewal date
Cross‑checking inside Perplexity gives you confidence that the subscription is tied to your account, regardless of how PayPal is configured for renewal.
- Open Settings or your account menu and select Billing or Subscription.
- Confirm the plan name (Pro), the billing method (PayPal), and the renewal/expiration date one year out.
- If you cancelled auto‑renew in PayPal, expect to see Pro active with an expiration date, but no pending renewal charge on file.
A rigorous testing plan for Pro features
With the administrative setup in good shape, you can move into evaluation. The goal isn’t just to “try everything once” — it’s to build a repeatable, light‑touch framework that shows you what’s faster, clearer, and more trustworthy with Pro.
Measurement philosophy: go small, compare, then scale
Too many tests fail because they measure everything at once. Instead:
- Start with short prompts that isolate a single capability (e.g., “extract 5 facts with citations” or “compare 3 sources on X”).
- Run the same prompt in Search and Research to compare speed, depth, and citation quality.
- Introduce only one new factor at a time (e.g., a different model, a file attachment, or a longer output format).
- Scale to your real task once you’ve found the right mode and model pairing.
Build a reproducible test set
Pick 5–8 prompts that represent the variety of your work. Examples:
- News brief: “Summarise the last 7 days of UK energy policy updates with links to official sources and major outlets.”
- Comparative research: “Compare the pricing and feature tiers of [three rival products] as of today. Present in a table with sources.”
- Technical synthesis: “Explain [technical concept] for a non‑technical stakeholder; cover trade‑offs, failure modes, and mitigation strategies with citations.”
- Document analysis: “From this PDF, extract key definitions and compile a glossary; include page references.”
- Data assisting: “From this CSV, detect anomalies and suggest a simple visualisation; provide code to reproduce in Python.”
- Image ideation: “Create three concept images for [campaign idea], each with a distinct style. No embedded text.”
Core metrics to track
- Latency: How long does the first meaningful content appear? How long to complete?
- Depth: Did the output cover all sub‑questions and edge cases?
- Provenance: Are citations present, recent, and relevant? Are sources authoritative?
- Structure: Is the output usable without heavy editing? Tables correct? Headings clear?
- Follow‑up agility: Does it handle clarifications and expansions without losing thread context?
- Limits: Any warnings or caps hit (e.g., context limit, file size, or rate limits)?
Lightweight recording template
Keep your log in a simple spreadsheet or note:
- Prompt (verbatim)
- Mode (Search/Research) and model selection
- Attachments (file names, sizes)
- Latency (rough seconds) and perceived responsiveness
- Output quality notes (structure, accuracy, completeness)
- Citation score (0–5) and any broken/outdated links
- Follow‑up result (better/same/worse)
- Verdict and next time choice (which mode/model)
A week‑long test schedule (example)
- Day 1: Upgrade verification, billing checks, and setting up the recording template.
- Day 2: Search mode tests across 3 prompts (news brief, comparison, technical synthesis). Rate citations.
- Day 3: Research mode tests on the same 3 prompts; request a longer, structured output (e.g., a mini‑report) with bibliography.
- Day 4: File analysis — PDF and CSV — including pagination references and simple code to reproduce a proposed chart.
- Day 5: Image ideation — 3 concepts, each with stylistic constraints and iteration instructions.
- Day 6: Model trials — keep the best two prompts and rerun with manual model selection. Compare tone, latency, and citations.
- Day 7: Wrap‑up — choose your default mode/model pairings; write a one‑page summary of Pro’s value to your workflow; note what to explore next month.
Advanced Search techniques: precision without friction
Search mode is fast and source‑forward. You can make it even sharper by controlling scope and format without bloating your prompt.
- Scope clamp: “Only include sources published in the last 12 months; prioritise official government or regulator sites for statistics.”
- Disallow fillers: “No generic advice; cite every key claim; exclude content farms or low‑authority blogs.”
- Output framing: “Answer in 3 sections: What’s known, What’s uncertain, What to watch next (each with 2–3 citations).”
- Compare and contrast: “Present a table with 5–7 rows; each row links to a different source; add a one‑sentence interpretation per row.”
- Follow‑up drill‑down: “From your citations, open the most technical source and explain its methodology in plain English; keep links intact.”
If your output loses citations, that’s a clue the response path leaned into a non‑retrieval model. Bring it back by saying, “Re‑answer in Search mode with citations to the most recent, authoritative sources.” You can also ask for a “references‑only output” to quickly scan the source list before committing to a longer synthesis.

Going beyond with Research mode: structure, scope, and stamina
Research mode shines when you need a well‑organised report. Treat it like a miniature research assistant: set objectives, specify the outline, and ask for a bibliography. Then iterate by section.
- Define the skeleton: “Create a 7‑section outline covering Background, Market Landscape, Methods, Risks, Regulatory, Open Questions, and Recommendations. Then fill each section with citations.”
- Constrain length and density: “Aim for 1–2 paragraphs per section, with 2–3 citations each; no more than 1,000 words total.”
- Bibliography style: “Provide a bibliography grouped by type (official, academic, industry, news). Include the publication date next to each item.”
- Method transparency: “List your top 10 sources and explain in one line why each was chosen.”
- Gap‑finding: “State what you could not verify and what data would be needed to confirm it.”
If the first pass is too general, ask it to “tighten scope to [country/industry/timeframe]” and “replace general sources with domain‑specific reports” or “include at least two primary sources.” You can also ask for an executive summary upfront and a technical appendix at the end.

Model selection in practice: when to steer, when to let it auto‑route
“Best” is a sensible default because it routes around outages and balances speed and quality. Still, manual selection can help in two cases:
- Tone and style: If you need a more straightforward, analytical voice, try a model that is known to be concise or logic‑oriented. For a more creative or narrative tone (e.g., ideation, campaign concepts), switch to a model that trades a touch of latency for fluency.
- Latency and determinism: For quick, bullet‑heavy outputs (tables, checklists), a snappier model may help. For multi‑step reasoning, a model that is slower but more thorough can pay off.
Keep an eye on citations: if a manual model selection produces fewer or no citations for a query that requires provenance, nudge the system by explicitly running in Search/Research mode and asking for sources. You can mix and match: draft with a creative model, then switch back to Search to embellish with citations.
File analysis at scale: multi‑file, cross‑document synthesis, and verification
Pro’s file uploads can anchor your research to your materials. You’re not limited to single‑document summaries; you can orchestrate a multi‑file conversation with traceable references.
- Cross‑document comparison: “Compare definitions of ‘material risk’ across these three PDFs; produce a consolidated definition; cite document and page for each component.”
- Timeline construction: “From the attached reports, build a 2019–2024 timeline of key regulatory changes; include exact dates and page references.”
- Evidence table: “Extract claims made about [topic]; map each claim to page numbers and confidence level; flag contradictions between documents.”
- Quote bank: “List direct quotes (with quotation marks) on [subtopic]; attribute to document and page. Avoid paraphrasing.”
- Code extraction: “Read the attached notebook; explain each step in plain English; output a cleaned version of the code with comments.”
Be explicit about how you want references presented: “Use the pattern [DocumentName.pdf, p. X] at the end of each sentence that depends on the file.” If you see vague or missing references, ask it to “re‑answer with page‑accurate citations only” or “provide a per‑file summary first, then a synthesis that quotes from each file explicitly.”
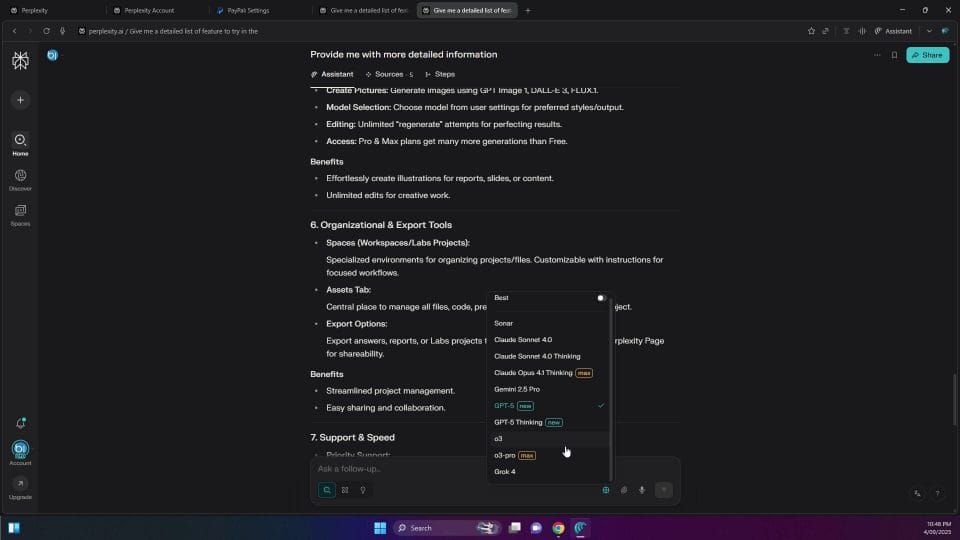
Image generation: from idea to layout‑ready
Treat image generation as concept development. You can maximise signal with a crisp structure: subject, scene, style, and constraints.
- Subject: “A compact indoor herb garden on a windowsill.”
- Scene: “Soft morning light, shallow depth of field, a kettle in the background.”
- Style: “Editorial photography with muted tones, natural textures; avoid surreal elements.”
- Constraints: “No embedded text; centre composition; aspect ratio 4:5.”
Iterate quickly: “Provide three variations — one closer crop on the basil leaves, one wider shot including the window frame, and one angled from above.” If you need to add text, do it in a design tool rather than asking the generator to place typography; rendering text reliably in images is still inconsistent.
- Reference boards: Upload 2–3 example images and say, “Match colour grading and lighting mood from these references.”
- Consistency: For a set (e.g., a campaign), ask for a “consistent camera setup (50mm lens equivalent, f/2.8) and lighting direction (window light from right).”
- Ethics and licensing: Use generated visuals as starting points; verify any external assets are licensed for your use.
API credits: build micro‑tools and measure viability
Your $5 in API credits is ideal for tiny, focused prototypes that teach you about latency, costs, and integration flow. Think “one job, done well” tools that you can reuse daily.
- CLI helper: A command‑line summariser that takes a URL and returns a 7‑bullet brief with citations and a “so what” paragraph.
- PDF brief generator: A micro‑service that ingests a PDF, extracts key points with page references, and emails a Markdown summary.
- Sheet companion: A Google Sheets script that transforms a column of messy product descriptions into a clean feature matrix.
Keep it frugal and predictable:
- Cache aggressively. Hash inputs (URL + parameters) and store outputs so identical requests never hit the API twice.
- Constrain prompt size. A short, clean instruction often works better than a long, rambling one — and it’s cheaper.
- Rate‑limit and batch. Queue non‑urgent jobs and process at a steady pace to avoid spikes and hitting caps.
- Log prompt, tokens, latency, and cost per call. After a week, you’ll know whether to scale and what it would cost monthly.

Role‑based playbooks: turning features into outcomes
While the core techniques are universal, the winning patterns differ by role. Use these as starting points and adapt to your team’s deliverables.
Marketers
- Campaign research: Search for market signals, competitors’ angles, and recent shifts; verify via citations.
- Brief creation: Research mode to produce a structured creative brief with audience insights, positioning, and key messages.
- Asset ideation: Image generation for moodboards and layout testing; add final copy in your design suite.
- Performance review: File upload last month’s analytics PDF; ask for anomalies, opportunities, and a prioritised test plan.
Product managers
- Landscape scan: Search mode to map competing features, release cadence, and pricing changes with sources.
- RFC support: Research mode to draft a problem statement and alternatives analysis with risk trade‑offs.
- User feedback synthesis: Upload user interview notes and extract themes, quotes, and contradictions.
- Roadmap clarity: Ask for a one‑pager executive summary that aligns user pain points to proposed epics.
Engineers
- Design choices: Search for state‑of‑the‑art approaches and security considerations; insist on technical citations.
- Code walkthroughs: Upload a snippet or notebook; ask for a line‑by‑line explanation and tests you might add.
- Migration checklists: Research mode to produce stepwise plans, rollback procedures, and monitoring hooks.
- Operational notes: Summarise incident reports into action items and playbook updates.
Researchers and analysts
- Literature mapping: Research mode for a mini‑review with primary sources; request a bibliography grouped by type.
- Evidence tables: Multi‑file extraction into a comparable schema; cite page numbers rigorously.
- Contradiction analysis: Ask for areas of disagreement among sources and what would resolve them.
- Update passes: Re‑run Search monthly to capture recent studies and integrate into your baseline report.
Students and educators
- Study guides: Summarise syllabi and textbooks into chapter‑by‑chapter outlines with key questions.
- Source evaluation: Ask it to assess the credibility of a reference list; check for recency and relevance.
- Practice questions: Generate flashcards or structured problems with worked solutions, citing concepts to textbooks where possible.
- Academic integrity: Use outputs as study aids; write your own work and cite your sources appropriately.
Journalists and communications
- Rapid backgrounders: Search mode to gather basics and source lists on a breaking topic.
- Source tracing: Ask for primary documents; avoid relying on second‑hand summaries.
- Fact grids: Build a table of claims, who said them, and links to original statements or filings.
- Draft refinement: Use Research mode to craft a structure, then independently verify every factual assertion.
Collaboration and knowledge capture without the sprawl
Threads are your project artefacts — treat them as living notes. With Pro, you can keep a clean library by naming, grouping, and sharing sensibly.
- Thread naming: Start with [Project/Client] – [Topic] – [Mode]. Example: “ACME – EU Compliance Scan – Research”.
- Collections: Group related threads so newcomers can see the arc from scouting (Search) to synthesis (Research) to file‑based analysis.
- Share links with context: When sending a thread, add a one‑sentence “what to do next” and note any caveats (e.g., “Citations missing in section 3; needs verification”).
- Export habits: For milestones (e.g., the final brief), export to your document system of record and link back to the thread.
- Version bump: Don’t overwrite earlier conclusions; create a new thread when the scope changes materially, and cross‑link them.
Advanced troubleshooting: when good runs wobble
Even with Pro, you’ll sometimes hit edge cases. Here’s how to keep momentum.
- No citations appear: Say, “Re‑answer in Search mode and show citations inline after each claim.” If still missing, reduce the question to one sub‑question and try again.
- Conflicting answers: Ask for a “disagreement analysis” — which sources disagree, on what, and why? Request side‑by‑side quotes with links.
- Paywalled sources: Ask for an open‑access alternative or a published summary. If you have access to the paywalled document, upload it and request a summary with page references.
- Run stalls or loops: Stop generation, re‑prompt with a reduced scope and a word limit, then expand gradually.
- Rate limits: Batch your work and queue non‑urgent tasks. If you hit a cap unexpectedly, take a short break and resume with smaller chunks.
- File parsing hiccups: Re‑upload a clean copy (flattened PDF, remove password), or extract the relevant pages as a separate file; restate your citation format.
Ethical use, compliance, and safety in practice
Pro unlocks speed; ethics keep you safe. Build these guardrails into your everyday prompts and workflows.
- Data minimisation: Upload only what’s necessary. Redact personal or sensitive identifiers unless you have explicit consent and a policy basis.
- Source diligence: Prefer primary sources; timestamp critical facts; avoid out‑of‑date citations for time‑sensitive matters.
- Bias checks: For qualitative outputs (e.g., personas, recommendations), ask, “List potential biases in this output and how to mitigate them.”
- Attribution: If you publish outputs, disclose that AI‑assisted synthesis was used, and provide source links.
- Audit trails: Keep your evaluation logs and final prompt sets. These help you explain how you reached conclusions.
Optimising speed, cost, and quality: patterns that compound
Small habits multiply the value of Pro over a year.
- Skeleton first: Ask for an outline, then fill in sections; this avoids rewriting a long, unfocused draft.
- Sectional prompting: “Write section 2 only (250 words) with 2 citations.” This tightens both style and provenance.
- Reusable preambles: Save a few standard instructions (citation policy, tone, formatting) and paste them rather than retyping ad‑hoc variants.
- Source‑first runs: For complex briefs, start with a “references‑only” list to vet before asking for synthesis.
- Constrain verbosity: Use hard caps (“max 500 words”, “max 7 bullets”), then ask for expansions where necessary.
- Avoid prompt drift: If a thread goes off‑track, open a fresh thread with the distilled, correct instruction to reset context.
Renewal calculus: an evidence‑based scorecard after 12 months
Deciding to renew should be simple if you’ve kept even a light log. Use this framework to make the call:
- Throughput gains: Estimate hours saved per month from Search/Research and file analysis. Multiply by your hourly cost or value.
- Quality uplift: Note where Pro outputs improved deliverables (better structure, fewer revisions, stronger citations).
- Risk reduction: Count the times a citation check prevented a mistake or identified an outdated claim.
- Feature usage: Which features became indispensable (e.g., Research, file citations, image ideation, API micro‑tools)? Which went unused?
- Limits friction: Did you hit caps often? If not, Pro’s raised limits may be sufficient; if yes, consider workflow adjustments.
- Alternative cost: If you replaced other subscriptions or reduced research outsourcing, tally those savings.
Summarise in one page with examples and a decision recommendation. If you choose not to renew, export key threads, archive your best prompt sets, and plan an alternative workflow that preserves your highest‑value patterns.
Frequently asked questions
- Will cancelling auto‑renew in PayPal end my current Pro year?– No. Cancelling the automatic payment only stops the next charge. Your current year remains active until its expiration date.
- What if Pro features don’t appear on one device?– Sign out and sign in again on that device. If needed, clear cache or use a private window to force a fresh session.
- Why did my output lose citations?– The response path likely used a non‑retrieval mode. Re‑run in Search or Research and explicitly request citations.
- Can I upload confidential documents?– Only if this aligns with your organisation’s policy and the platform’s terms. Use isolated folders and redact sensitive data where appropriate.
- How do I handle paywalled sources?– Ask for publicly accessible alternatives or upload the document you have access to and request a page‑referenced summary.
- What if my region doesn’t show the PayPal offer?– Availability varies by region and time. Keep an eye on official announcements or check periodically from the in‑product promotional page.
- How should I compare models fairly?– Use the same prompt, scope, and constraints; record latency, structure, and citation quality; then choose based on your task needs.
Ready‑made prompts and checklists
Search prompts (copy/paste and adapt)
- “Summarise the last 14 days of developments in [topic/region]. Provide 5–7 bullet points with citations, prioritising official and primary sources. Exclude low‑authority blogs.”
- “Build a comparison table for [3 products/services], listing price, feature highlights, limitations, and ideal use cases. Include a source link for each row.”
- “Identify 8–10 key risks in [domain]. For each, provide a one‑line mitigation and a citation to a recent, authoritative source.”
Research prompts (structure‑first)
- “Produce a structured report on [topic] with sections: Background, Current Landscape, Key Debates, Risks, Open Questions, Recommendations. Limit to 1,000 words. Include 2–3 citations per section and a grouped bibliography.”
- “Outline a research plan to evaluate [hypothesis]. Specify objectives, data sources, methods, success criteria, and limitations. Provide an initial reading list with the publication date noted.”
- “From the sources you consider, list the top 10 with one‑sentence justifications. Then write a 300‑word executive summary with inline citations.”
File analysis prompts (page‑aware)
- “From the attached PDFs, extract definitions of [term] and produce a consolidated version. Cite as [Filename.pdf, p. X] for each component.”
- “Build a timeline (2019–present) of [policy/market] changes from these documents. For each event, list date, a one‑sentence summary, and [Filename.pdf, p. X].”
- “Create an evidence table of claims about [topic], listing claim text (quoted), supportive source and page, and confidence level (High/Medium/Low).”
Image prompts (constraints‑forward)
- “Design three concept images for [idea]: consistent palette (cool neutrals), soft natural light, 4:5 aspect ratio, minimal props, no embedded text. Provide variations that differ by composition (tight/medium/wide).”
- “Re‑render the prior concept with a warmer colour temperature and a slightly higher angle. Keep style consistent and avoid adding new objects.”
API micro‑tool prompts (synthesiser core)
- “You are a concise summariser. Given a URL, return: 7 bullets (max 15 words each), 1 ‘so what’ paragraph (max 70 words), and 3–5 references with titles and links. Prefer primary sources; exclude low‑authority sites.”
- “Given PDF text and metadata, extract: top 10 insights with [Filename, p. X] references; then output a 200‑word abstract.”
Quality control checklist
- Did I choose the right mode (Search for scouting, Research for writing)?
- Are citations present, recent, and authoritative? Any broken links?
- Is the structure usable without major rewriting? Did I set word limits?
- For files: do page references appear in the correct format?
- For images: did I avoid embedded text and specify composition/constraints?
- Security: did I avoid uploading unnecessary sensitive data?
- Outcome: do I know the next action (refine, verify, or publish)?
Putting it all together: a model day with Pro
Here’s an example of a focused, end‑to‑end day using Pro efficiently.
- 09:00 — Search run: “Today’s policy changes on [topic] with citations; 5 bullets and references‑only list.”
- 09:20 — Vet sources: Open 3–4 promising links; discard outdated or off‑topic items.
- 09:40 — Research outline: “Write a 7‑section report (max 1,000 words) with 2–3 citations per section.”
- 10:15 — File layer: Upload two PDFs gathered; “Integrate direct quotes with [Filename, p. X] into sections 3 and 5.”
- 11:00 — QC pass: Ask for “assumptions, uncertainties, and missing data” as a bullet list.
- 11:20 — Export: Copy the report to your document hub; add a header noting date and key sources.
- 11:40 — Image ideation: “Three layout concepts for the report cover; 4:5 ratio, muted palette, no text.”
- 12:00 — Lunch.
- 13:00 — Stakeholder version: “Create a 200‑word executive summary with inline citations.”
- 13:20 — Follow‑ups: “If we had to gather missing data, list 5 concrete steps and likely sources.”
- 13:40 — API test: Run the same topic through your summariser micro‑tool; compare cost/latency vs in‑app.
- 14:00 — Archive: Tag threads, file assets, and link to the final deliverable in your project tracker.
Interface cues to keep you oriented
As you switch between modes and attach files, cultivate the habit of scanning the UI for mode labels, attachment badges, and citation indicators. A quick glance can save you from an off‑mode response or a missing source trail.
(Note: If your interface has changed or looks different, the principles stay the same: verify mode, verify attachments, and read the first few lines to confirm the engine is doing what you asked.)
A final note on longevity
Your free year is more than enough time to turn Perplexity Pro from an experiment into a core capability. The difference between a casual trial and a genuine upgrade to your practice is the small repeatable behaviours: pick the right mode, demand provenance, iterate section‑by‑section, and maintain a tidy library of threads. Keep your prompts short and your quality control tight. When renewal day arrives, you won’t be guessing — you’ll know precisely what Pro did for you and what you want to do next.

Marco / admin / 30 Nov
Writing day to day ramblings about making money, business, technology, sharing awesome deals and everything else that I know I'll forget. Follow my personal blog https://marcotran.com.au
I've recently also turned Vegan and started this website Veggie Meals - check it out
"When technology speaks for itself, that is art" - MT
Affiliate Compensated: there are some articles with links to products or services that I may receive a commission.
OTHER ARTICLES YOU MAY LIKE

USING THE LATEST CLAUDE MODEL TO BUILD GREAT TOOLS
If you have ever had an idea for a small tool but stopped because coding felt too hard, the latest Claude model makes that gap much smaller. You can now describe what you want in plain English, ask Claude to plan it, build the first version, improve the design, write the logic, test the workflow, […]
read more
REVIEWING AND UNBOXING THE TOOCKI USB-C RIGHT ANGLE 1.2M CABLE
USB C cables are among the most ordinary accessories we own, yet they can make a surprisingly noticeable difference to how comfortable our devices are to use while charging. The Toocki USB C right angle cable is a good example of a simple accessory that tries to solve a very common irritation, because instead of […]
read more