HOSTING WITH ALICLOUD ALIBABA -HOW TO AND TIPS
June 26, 2017 / by Marco / Categories : Business, Technology, Websites, Wordpress
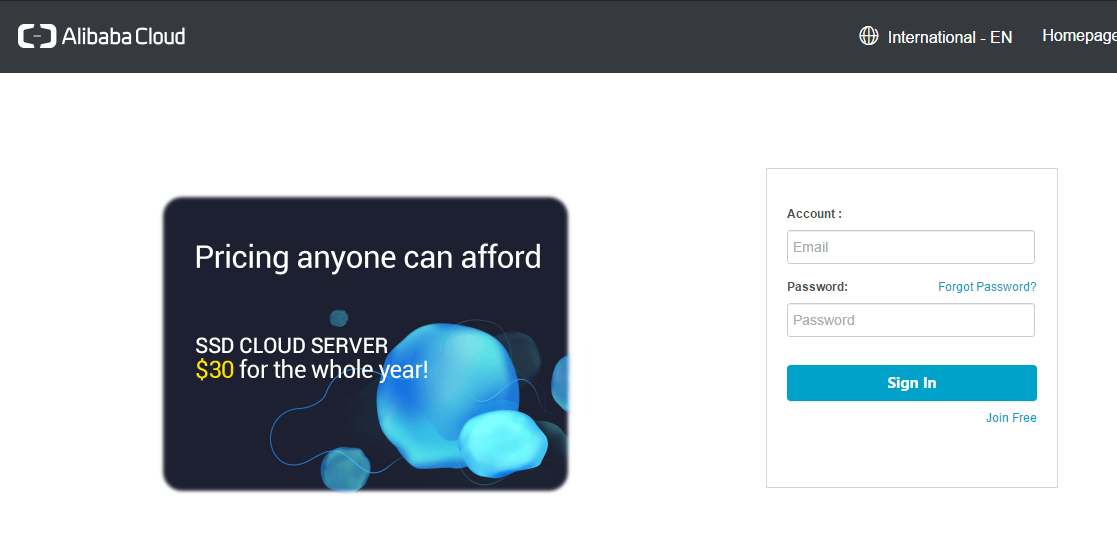
Currently, Alicloud has a special that give you Elastic Cloud hosting for USD$30 for the first year – this is really cheap! What you get is:
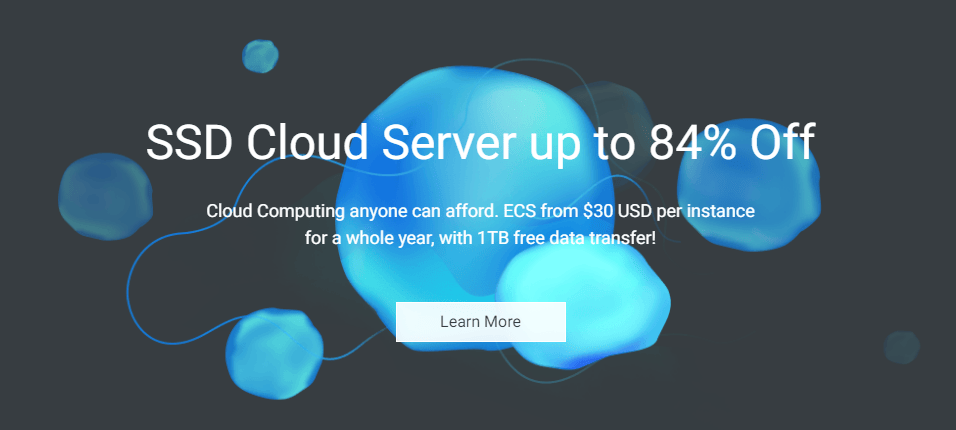
If you want to try it out click on this link – AliCloud or click on the image.
One of the main reasons why I decided to try Alicloud was because of the free DDoS attack protection and also because it is a very competative and cheap price. One of the downsides with this hosting is the memory limitation of 1GB.
I’m a newbie when it comes to AWS (never really used it before and only ever player around with it) but I did manage to set up the VPS instance with AliCloud and thought I’d share it with you here. When selecting which regions you want your Elastic Cloud instance to reside, pick one where you think most of the traffic will come from.
When the setup was completed I logged in and changed the password to the VPS Instance.
CHANGE ROOT PASSWORD TO ALICLOUD INSTANCE
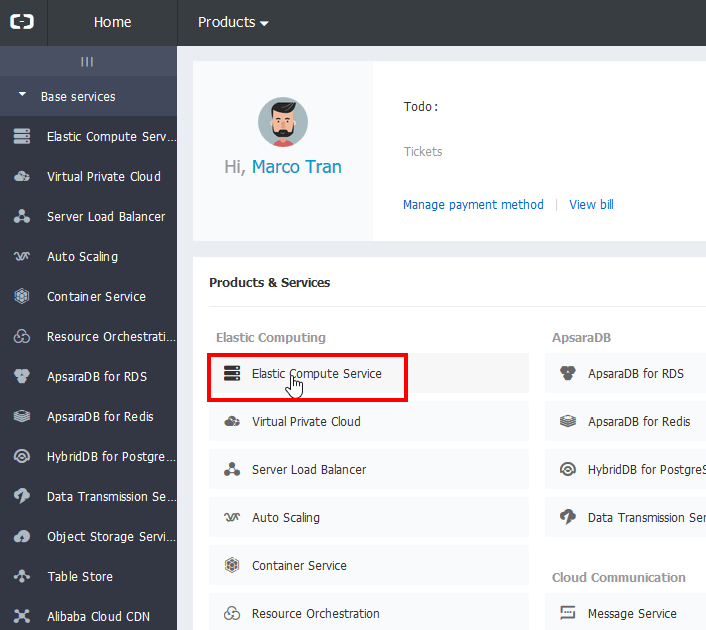
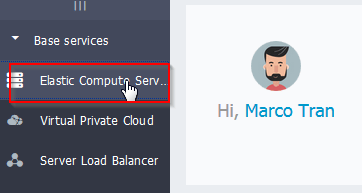
Login to the console
Once logged in click on Elastic Computer Service in the Base Services
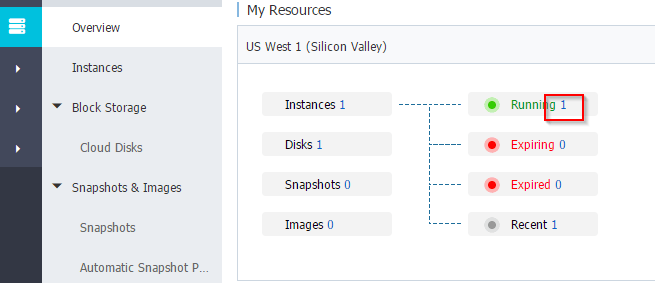
This page will show you all the regions and whether you have instances in that regions. In my case, I have one in the Silicon Valley (US) and another in the Sydney area. The Silicon Valley is for a website where the majority of visitors is from the US and Europe.
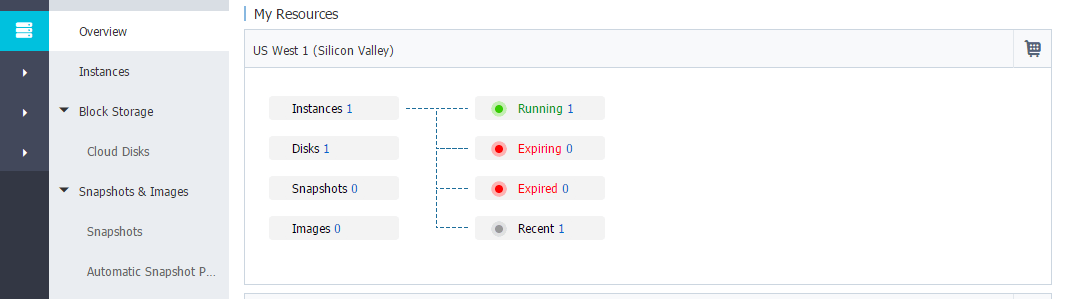
I have one in the Asia Pacific SE 2 (Sydney) region as I wanted one that was local and closer to my user base. At the bottom just choose the region where the service resides.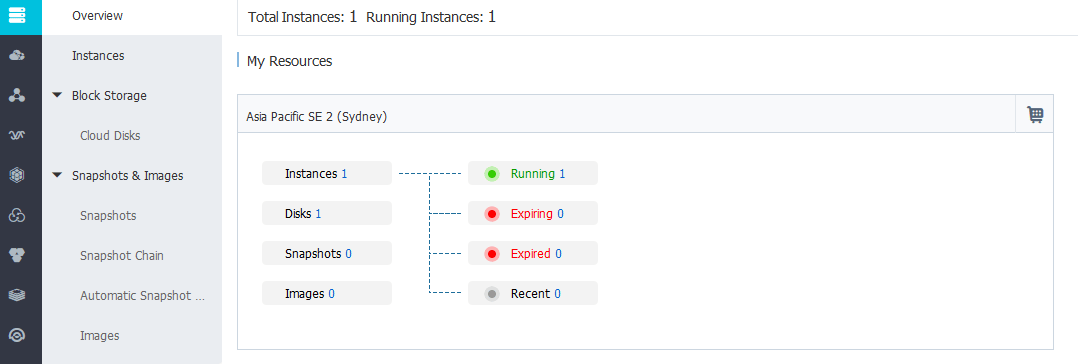
To manage the instance click on the number next to Running.

Click on more on and then Reset Password
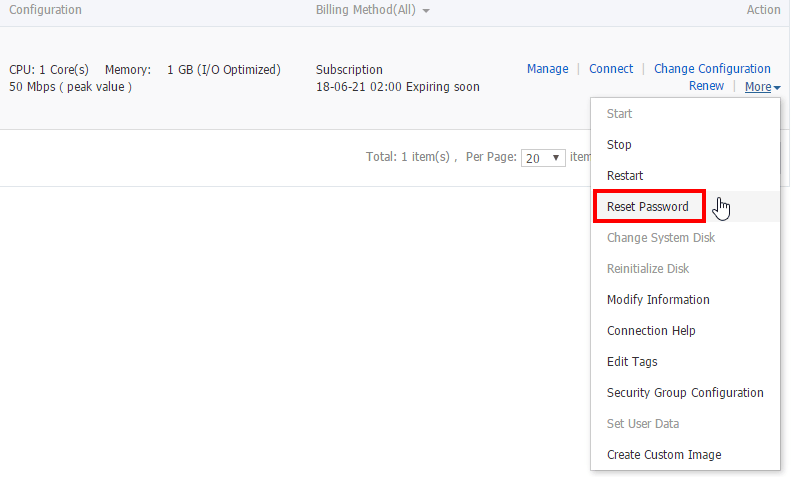
Then enter a password that meets all the criteria specified: 8-30 characters. It must contain three character types (uppercase letters, lowercase letters, numbers and the following special characters). Click on Submit.

As per the note, for the password to apply you will need to restart the instance. To do this click on the more button and select restart
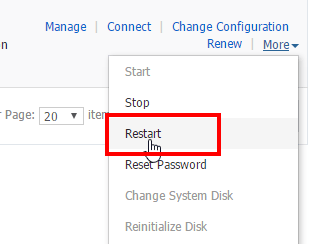
Select Restart and Click on OK

The instance will now restart and you will see the status changing to Stopping
The status of the instance will change to Running when it’s ready and has completely restarted.

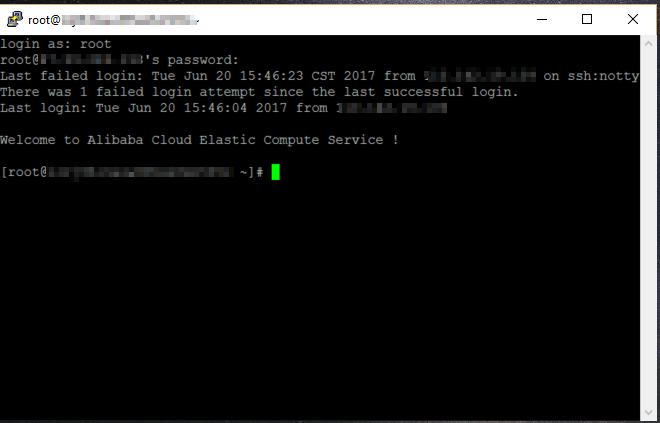
Now use a SSH tool like PUTTY and connect to the instance. Use root as the username and enter the password you just changed.
ADDING SWAPSPACE TO ALICLOUD
The instance only has 1GB of memory and 40GB of storage. I recommend you add some additional swap space so you can use for virtual memory.
A quick way to check how memory you have is to type TOP.

As you can see there is no swap space allocated so let’s add some. Follow these steps (these are for a CentOS platform):
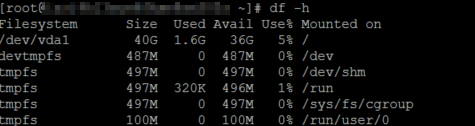
Check storage available
df -h
Filesystem Size Used Avail Use% Mounted on
/dev/vda1 40G 1.6G 36G 5% /
devtmpfs 487M 0 487M 0% /dev
tmpfs 497M 0 497M 0% /dev/shm
tmpfs 497M 320K 496M 1% /run
tmpfs 497M 0 497M 0% /sys/fs/cgroup
tmpfs 100M 0 100M 0% /run/user/0
Since this instance will only house several WordPress sites, I’m planning to just add 4 times the amount of virtual memory. You can stick with double but I’m just going with 4 times to give it some more buffer. Now create the swapfile:
sudo fallocate -l 4G /swapfile
![]()
Verify that the swap file has been created:
ls -lh /swapfile
-rw-r--r-- 1 root root 4.0G Jun 20 16:03 /swapfile
![]()
For security reasons, give the right permission to the swapfile by typing:
sudo chmod 600 /swapfile![]()
Check the permissions
ls -lh /swapfile
-rw------- 1 root root 4.0G Jun 20 16:03 /swapfile
![]()
Setup the swapfile
sudo mkswap /swapfile
Setting up swapspace version 1, size = 4194300 KiB
no label, UUID=6e828080-303a-473e-81d9-161ae3f2f271

Use the swapfile
sudo swapon /swapfile![]()
Check if the swapfile is active
swapon -s

Filename Type Size Used Priority
/swapfile file 4194300 0 -1

top

Tasks: 59 total, 1 running, 58 sleeping, 0 stopped, 0 zombie
%Cpu(s): 0.0 us, 0.0 sy, 0.0 ni,100.0 id, 0.0 wa, 0.0 hi, 0.0 si, 0.0 st
KiB Mem : 1016412 total, 842884 free, 49256 used, 124272 buff/cache
KiB Swap: 4194300 total, 4194300 free, 0 used. 828964 avail Mem

Now we need to make the swap file permanent by editing the fstab file
sudo vi /etc/fstab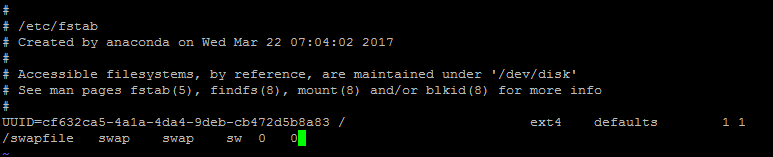
Change the cache pressure to a more optimal setting to 50 (default is 100)
sudo sysctl vm.vfs_cache_pressure=50
vm.vfs_cache_pressure = 50
![]()
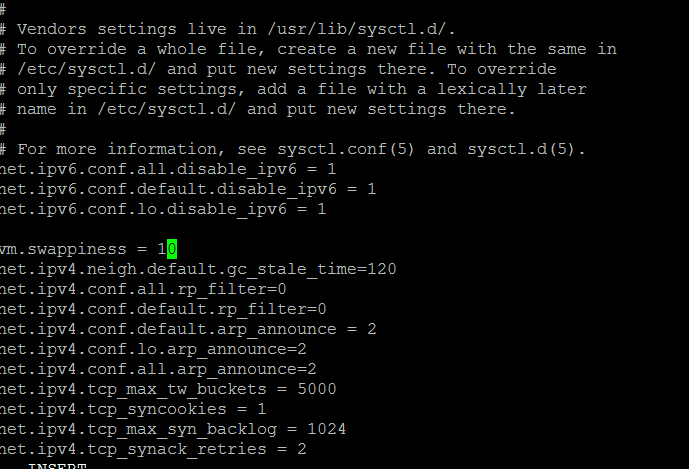
We need to do make the changes so it’s applied at the next reboot
vi /etc/sysctl.conf
add at the bottom:
vm.vfs_cache_pressure = 50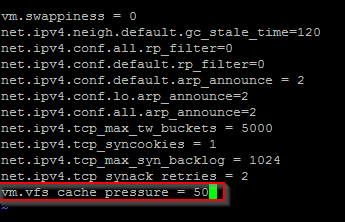
Change swappiness setting
sudo sysctl vm.swappiness=10![]()
Add the setting to make it permanent
vi /etc/sysctl.conf
reboot the instance after making the changes
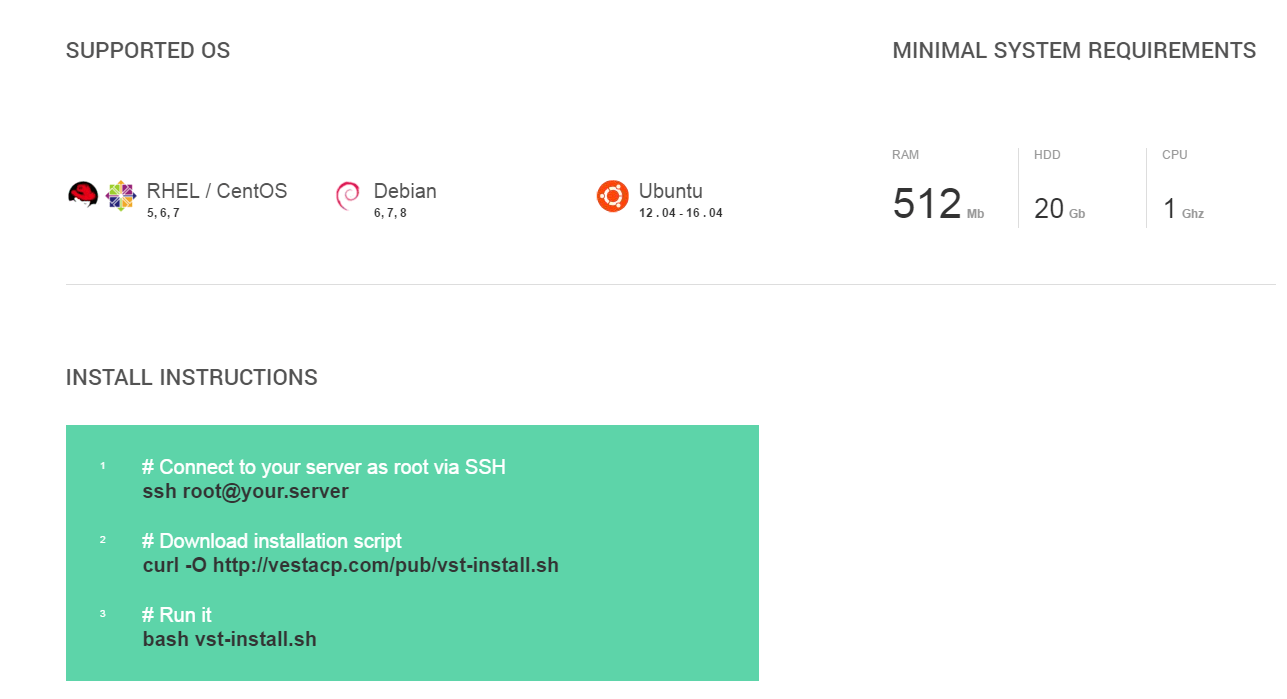
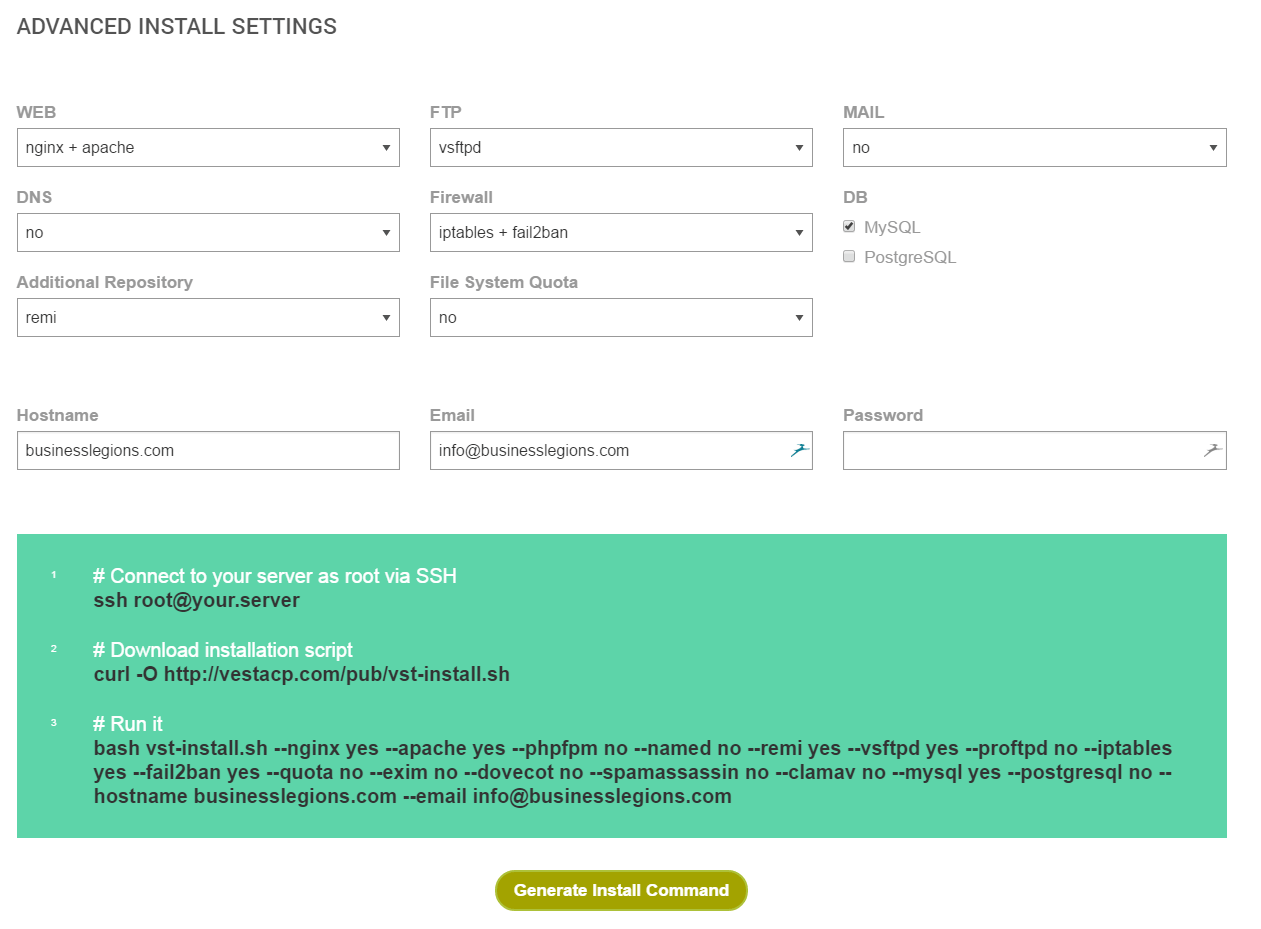
INSTALL HOSTING CONTROL PANEL – VESTACP ON ALICLOUD
I decided to use VESTACP as the Hosting control panel. The reason why is simple – it’s FREE. I use their advanced install settings page for creating the download script. I do this because I don’t need several features like mail or DNS hosting to save on memory, processor and storage I don’t install these features.
Go to this link: vestacp.com/install for the install instructions
If you want to customise the install so you can choose which feature are installed then follow the below steps. In the advanced settings don’t install MAIL and DNS (make sure they have NO)
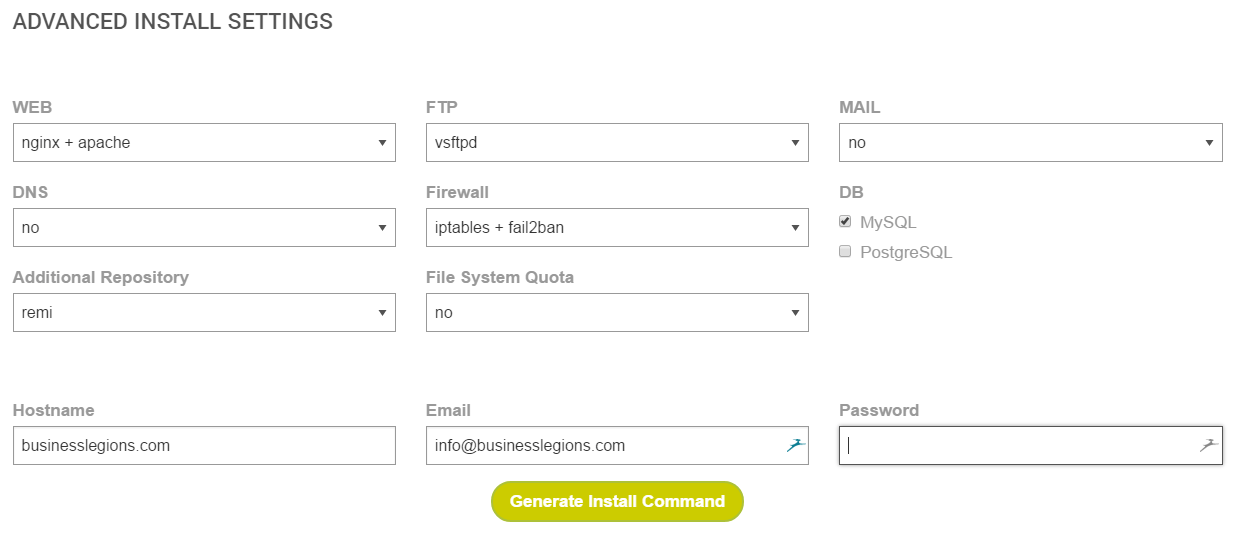
Click on the Generate Install Command and it will display the commands you will need to paste in your AliCloud instance
Now you need to download the installation script
Then run it by
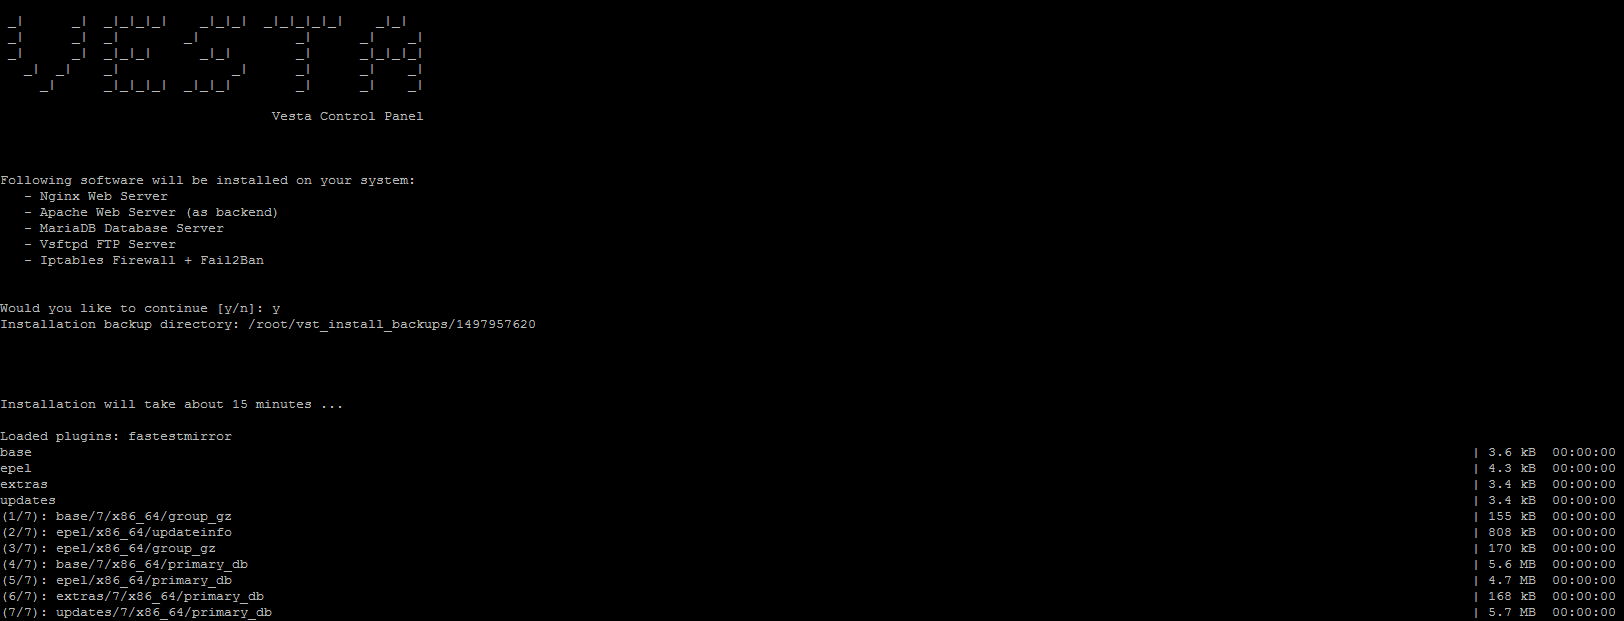
When prompted to continue, enter Y and press the ENTER key
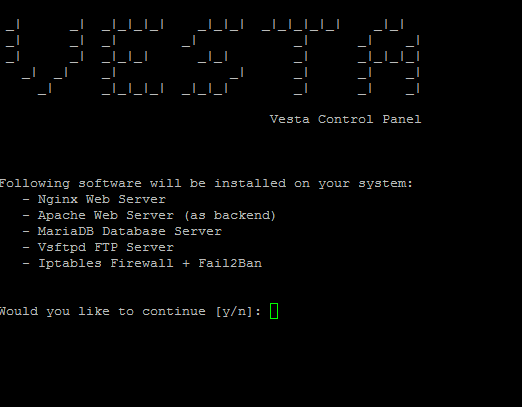
The script will run and the process will take about 15 minutes
Once the installation is complete you will see the settings to connect to the Vesta Control Panel.

That’s it. It’s now ready to be accessed, but you will need to open up some firewall rules to allow access to different TCP/IP ports.
FIREWALL ACCESS ON ALICLOUD
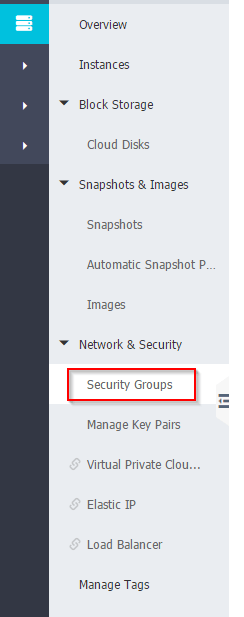
Login to the AliCloud console and click on the Security Menu
Elastic Computing Services and then select your instance
Click on Security Group
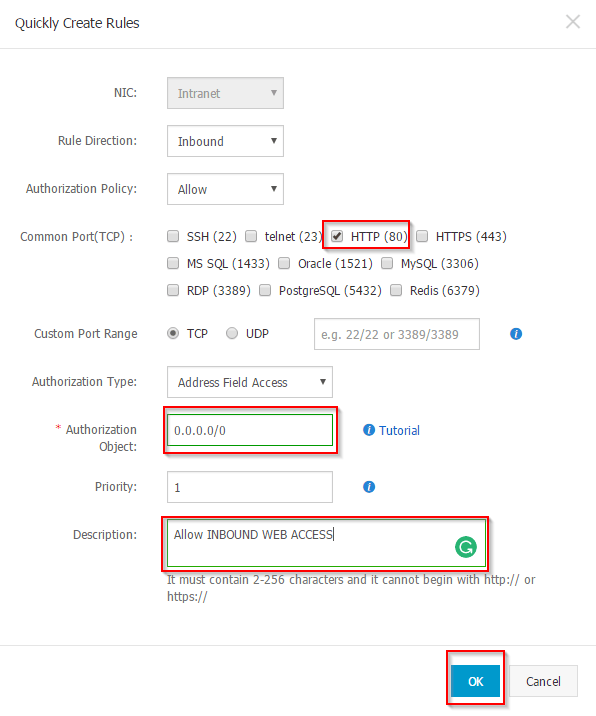
Click on Configure Rules

Add the HTTP and 8083 Ports required to access the Vesta Control Panel and website. Add the following settings:
FOR HTTP
- Select TCP port HTTP (80)
- Add the Authorisation Object 0.0.0.0/0 (this will allow all IP address to access the website)
- Add the description Allow INBOUND WEB ACCESS
- Click on OK
FOR FTP AND SSH ACCESS
There is already an existing rule for SSH (port 22) however, I wanted to restrict this access along with FTP access to only a few static IP address I use. The process is the same as above but you just need to use the port range (20/22). Here are the complete rules list (just remember to specify your IP address in the Authorisation Object.
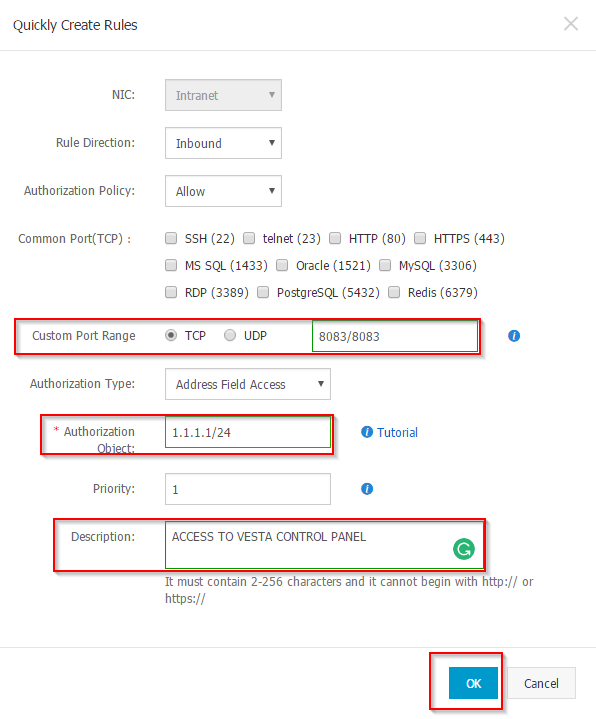
FOR VESTA CONTROL PANEL
- Select Custom Port Range TCP port 8083/8083
- Add the Authorisation Object 1.1.1.1/24 (Your IP or IP addresses that will require management access to the Vesta Control Panel)
- Add the description Allow ACCESS TO VESTA CONTROL PANEL
- Click on OK
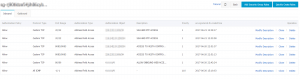
The list will display the new rules
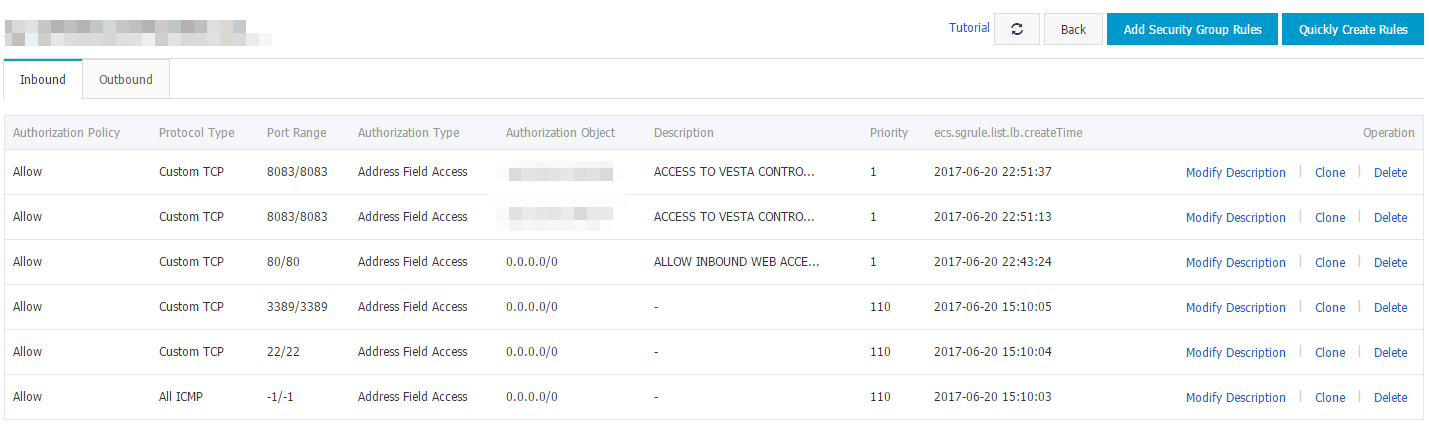
You can also delete port 3389 as this is not required on CentOS

ACCESS VESTA CONTROL PANEL
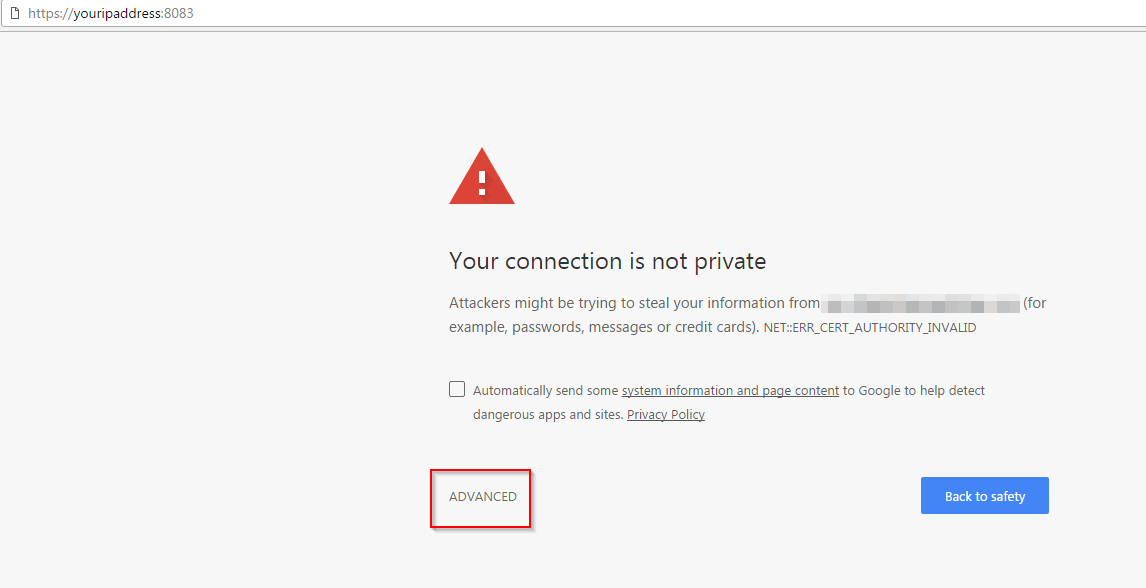
Now you should be able to access the Vesta Control panel. Just open up any web browser and enter the URL https://ipaddress:8083
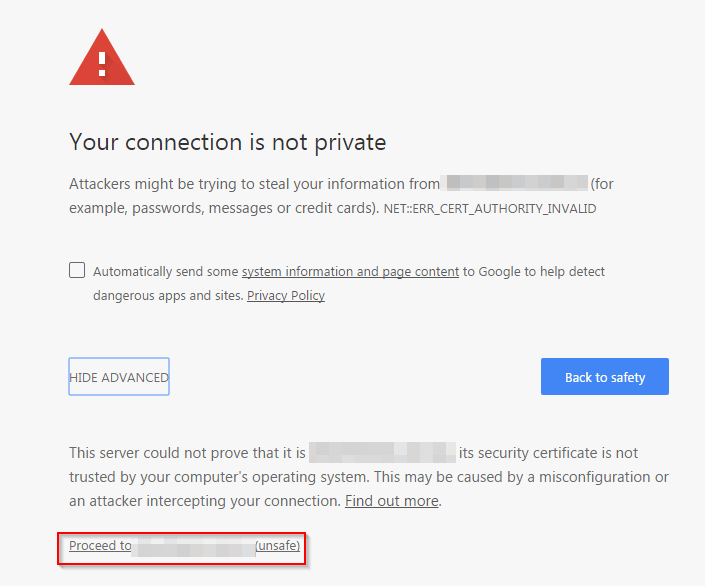
You will receive the following Certificate Error message, just click on Advanced
Click on Proceed to …(unsafe)
This will bring you to the Vesta Control Panel
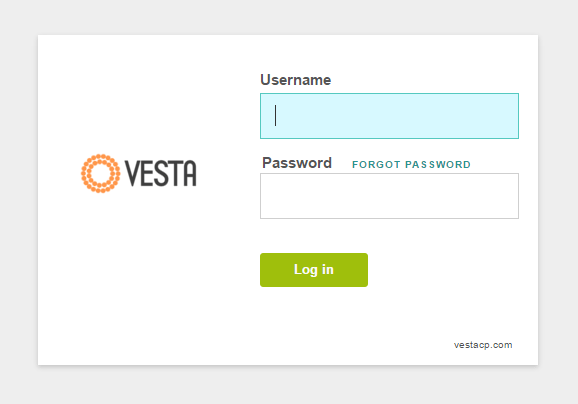
Just enter the login detail you previously used during the install script and you will be logged into the Control Panel
VESTA CONTROL PANEL SETTINGS
DISABLE BACKUPS
If you want to save space on the instance you can remove backups or decrease the number of OS backups. Click on Packages on the top menu

Click on Edit

In the Backups field enter 0 and click on save

SHORTCUT LINK TO WEB FOLDER
create a shortcut link directory:
ln -s /home/admin/web/ /web
![]()
CHANGE TIMEZONE
I prefer to change the timezone to my local timezone so I know exactly the time
cp /etc/localtime /etc/localtime.bak
rm -f /etc/localtime
ln -s /usr/share/zoneinfo/Australia/Sydney /etc/localtime
date

CHANGE MAXIMUM PACKET SIZE
For large database imports, we need to increase the maximum packet size allowed. Change it to 64M
vi /etc/my.cnf
![]()
Restart the database
systemctl restart mariadb.service
INSTALL WORDPRESS OR ANY OTHER CMS TOOL
Once you have installed Vesta CP you can create a database, website and pretty much install any self hosted CMS tool like WordPress, Drupal etc.
If you run into any problems leave me a comment and I’ll try to help.
Our Sponsors
- Advertise Me Pty Ltd

Digital Signage Solutions
- Fitness Mania
Everything to do with fitness products ranging from gym equipment, fitness clothing, protein powder and lots more.
- My Healthy App
My Healthy App curates all the best and latest mobile health apps.


Marco / admin / 30 Nov
Writing day to day ramblings about making money, business, technology, sharing awesome deals and everything else that I know I'll forget. Follow my personal blog https://marcotran.com.au
I've recently also turned Vegan and started this website Veggie Meals - check it out
"When technology speaks for itself, that is art" - MT
Affiliate Compensated: there are some articles with links to products or services that I may receive a commission.
OTHER ARTICLES YOU MAY LIKE

USING THE LATEST CLAUDE MODEL TO BUILD GREAT TOOLS
If you have ever had an idea for a small tool but stopped because coding felt too hard, the latest Claude model makes that gap much smaller. You can now describe what you want in plain English, ask Claude to plan it, build the first version, improve the design, write the logic, test the workflow, […]
read more
REVIEWING AND UNBOXING THE TOOCKI USB-C RIGHT ANGLE 1.2M CABLE
USB C cables are among the most ordinary accessories we own, yet they can make a surprisingly noticeable difference to how comfortable our devices are to use while charging. The Toocki USB C right angle cable is a good example of a simple accessory that tries to solve a very common irritation, because instead of […]
read more