Hosting Multiple Domains with one single hosting account
December 2, 2012 / by Marco / Categories : Business
Some people may not know this but if you own multiple domains, you DON’T need to buy individual website hosting for each domain name that you own. Yes, that’s right even if you’ve purchased various domain names from different providers you can still host them all on the one hosting account. The only caveat is that the plan you purchased from the web hosting company needs to support this. As an example, godaddy.com has a plan called Deluxe (the plan should include “Unlimited Websites”).
So here’s a brief summary of what you need to do (depends on which company you use for your domain and website):
1. Login to your domain provider account.
2. Find the domain name and click settings (or somewhere that says Nameservers). Here’s an example from crazydomains.com.au
Name Servers are basically Domain Name Servers that translates domain names (like businesslegions.com) to IP address – those weird numbers with “.” for example 66.96.133.9
But before you change any of these settings you need to login to your website hosting account and determine what name servers you will be using. This is very important because your website hosting provider will be the one responsible for directing visitor traffic to the correct website.
If you’re using godaddy.com as your hosting provider then the Name Servers varies and it’s based when you opened your account. You can check which name servers you should use by logging into your account.
3. Click Products – Web Hosting – Click Launch.
4. A new tab will open up and click on the DNS Manager button that looks like this:
5. Scroll down to the bottom and copy the Nameservers
In this case the Namservers are ns73.domaincontrol.com and ns74.domaincontrol.com
Also on the same page, at the top there is an entry with the @. Note down the IP address as this will be used for testing purposes later on.
6. Go back to your hosting details page and click on the hosted domains button:
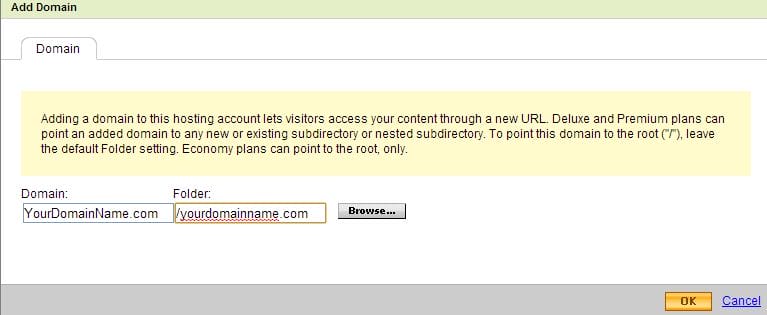
7. Click on Add Domain
8. Enter your domain name and the folder you intend to host the files for that particular domain. I normally create a new folder with the domain name.
That’s all the changes you will need to do on your website hosting account.
9. Now go back to your domain hosting provider in step 2 and add the nameserver from step 5. Click update or save
7. Now you need to open up the command prompt (that’s if you’re using Windows OS) and just type “ping [domain name]” e.g ping www.businesslegions.com and it should return the IP address that you noted in step 5. If not wait for a while as the DNS name is being propagated across on the Internet. This process can take from a few seconds to a few hours.
8. If it has updated, then enter the URL of your domain in a browser and it should work.
If you want to consolidate all your domains to one single web hosting account, then repeat the above steps.
Good luck and if you run into any problems feel free to contact me.
OTHER ARTICLES YOU MAY LIKE

BUGS IN TIKTOK WEB APP
In this article, I will discuss the bugs I have encountered while using the Tik Tok web app. When using the TikTok web app, I encountered a frustrating issue where I was unable to follow back users. This problem has persisted, leaving me with zero following despite my efforts to engage with the platform. As […]
read moreProductScope AI Lifetime Deal for $59
ProductScope AI Lifetime Deal for $59 Beautiful product photos and optimized copy in minutes for ecommerce brands, marketers & agencies Create beautiful product photos and optimized Amazon listings in minutes Improve your product visuals and gain customer insights for better sales Best for Content creators Ecommerce Marketing agencies Alternative to Adobe Photoshop Canva Integrations GPT-4 […]
read more


