Disabling Google Chrome Updates
October 18, 2015 / by Marco / Categories : Google, Technology, TIP AND TRICKS
By default Google Chrome automatically updates itself to the latest version. This is a good thing if you want to make sure you have the latest security updates and bug fixes. However, it was announced at the beginning of this year that NPAPI (which uses Java) will no longer be supported after Chrome Version 45, meaning for those of you who run Java plugins are actually stuffed!
The only way to still run the Java plugins is to roll back to an older version (pre version 45) and make sure Google Chrome updates is disabled. Initially I thought disabling Chrome updates was going to be easy but I ended up spending several hours figuring out how to do this.
UNINSTALL CHROME
- The first thing you need to do is uninstall the Version of Chrome from your PC. Just go to Control Panel, select Program and Features and select Google Chrome

DOWNLOAD OLD VERSION
- If you already have an old version of Chrome then use that, if not then go to this website and download a version that is older than 45.

CHROME SETTINGS
- Run the Chrome file and accept all defaults
- Once Chrome has been installed go into task manager and make sure the process called GoogleUpdate.exe is not running. If it is then select it and end the process
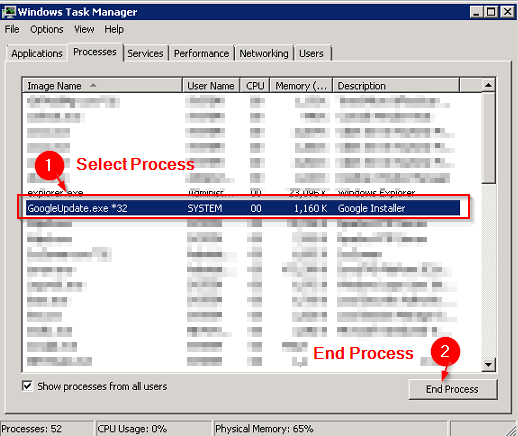
- Make sure GoogleUpdate.exe is no longer listed before moving to the next step.
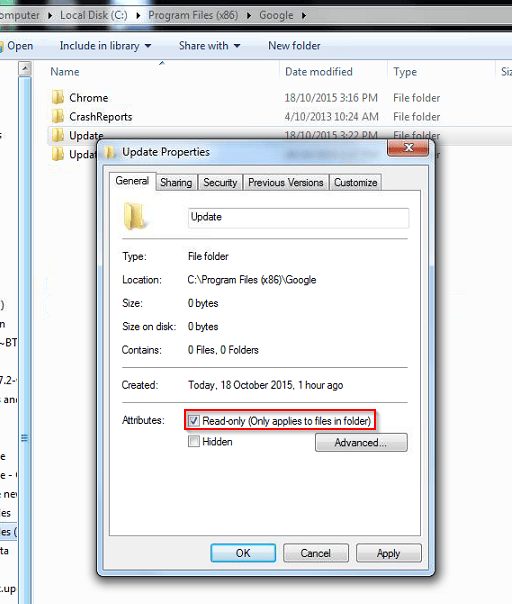
- Open up Windows explorer and go to the folder: C:\Program Files (x86)\Google
- In there you will see an Update folder. Rename that to Update.old
- Then create a new folder called Update and give it Read Only permissions – to do this just click on the folder and select the check box Read-only. This will make sure the Update files are not being copied to this folder. Make sure you click on OK.

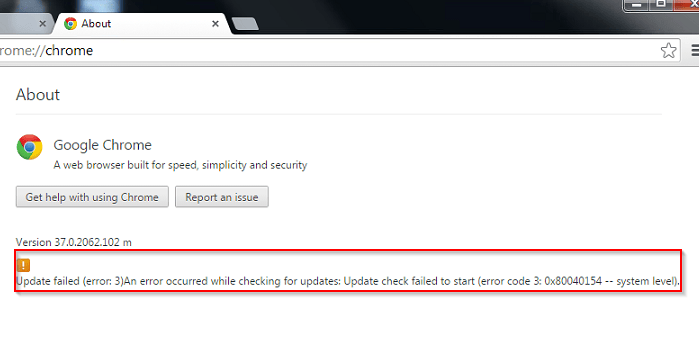
- Open up Chrome. Go to setting and click on About Google Chrome.

- You will notice that there is an error saying Update failed (error 3) An error occured while checking for updates: Update check failed to start (error code 3: 0x80040154 — system level). This is fine as we want the update to FAIL.

- Open up Windows Explorer and Right Click on Computer
- Select Manage

- Click on System Tools – Task Scheduler – Task Scheduler Library.


That should be it. This would have disabled Google Chrome Updates.

Marco / admin / 30 Nov
Writing day to day ramblings about making money, business, technology, sharing awesome deals and everything else that I know I'll forget. Follow my personal blog https://marcotran.com.au
I've recently also turned Vegan and started this website Veggie Meals - check it out
"When technology speaks for itself, that is art" - MT
Affiliate Compensated: there are some articles with links to products or services that I may receive a commission.
OTHER ARTICLES YOU MAY LIKE

REVIEWING AND UNBOXING THE TOOCKI USB-C RIGHT ANGLE 1.2M CABLE
USB C cables are among the most ordinary accessories we own, yet they can make a surprisingly noticeable difference to how comfortable our devices are to use while charging. The Toocki USB C right angle cable is a good example of a simple accessory that tries to solve a very common irritation, because instead of […]
read more
SUPABASE BACKUP TUTORIAL: USE DBEAVER TO EXPORT YOUR DATABASE SAFELY
If you are building anything serious on Supabase, whether that is a client portal, a SaaS app, an internal dashboard, or even a small side project that is starting to get traction, having a reliable database backup process is one of those tasks that quickly moves from optional to essential. Supabase makes a lot of […]
read more